This weekend, I tweeted the public URL of an AWS instance. Like most instances during this experimentation phase, it was not meant to live forever, so I’ll reproduce it here:
_________________________________________________________________________________________________________

This rails application was deployed to AWS with a single command. What happens when it runs?
- A shell script passes a CloudFormation template containing the instance and security group definitions to Boto.
- Boto kicks off the stack creation on AWS.
- A CloudInit script in the instance definition bootstraps puppet and git, then downloads repos from Github.
- Puppet provisions rvm, ruby, and rails.
- Finally, CloudInit runs Webrick as a daemon.
To do:
- Reduce CloudInit script to merely bootstrap Puppet.
- Let Puppet Master and Capistrano handle instance and app provisioning, respectively.
- Get better feedback on errors that may occur during this process.
- Introduce an Elastic Load Balancer and set autoscale to 2.
- Get a VPN tunnel to campus and access ND data
- Work toward automatic app redeployments triggered by git pushes.
Onward!
Brandon
_________________________________________________________________________________________________________
A single command, eh? It looks a bit like this:
./run_cloudformation.py us-east-1 MyTestStack cf_template.json brich tagfile
Alright! So let’s dig into exactly how it works. All code can be found here in SVN. The puppet scripts and app are in my Github account, which I’ll link as necessary.
It starts with CloudFormation, as described in my post on that topic. The following template creates a security group, the instance, and a public IP. This template is called rails_instance_no_wait.json. That’s because the Cloud Init tutorial has you create this “wait handle” that prevents the CF console from showing “complete” until the provisioning part is done. I’m doing so much in this step that I removed the wait handle to prevent a timeout. As I mention below, this step could/should be much more streamlined, so later we should be able to reintroduce this.
{
  "AWSTemplateFormatVersion" : "2010-09-09",

  "Description" : "Creates security groups, an Amazon Linux instance, and a public IP for that instance.",

  "Resources" : {

    "SGOpenRailsToWorld" : {
      "Type" : "AWS::EC2::SecurityGroup",
      "Properties" : {
        "GroupDescription" : "Rails web server access from SA-VPN",
        "VpcId" : "vpc-1f47507d",
        "SecurityGroupIngress" : [ {
        	"IpProtocol" : "tcp",
  		"CidrIp" : "0.0.0.0/0",
		"FromPort" : "3000",
  		"ToPort" : "3000"
    	} ]
      }
    },

    "BrandonTestInstance" : {
        "Type" : "AWS::EC2::Instance",
        "Properties" : {
            "ImageId" : "ami-83e4bcea",
            "InstanceType" : "t1.micro",
            "KeyName" : "brich_test_key",
            "SecurityGroupIds" : [
                { "Ref" : "SGWebTrafficInFromCampus" },
                { "Ref" : "SGSSHInFromSAVPN" },
                { "Ref" : "SGOpenRailsToWorld" }
            ],
            "SubnetId" : "subnet-4a73423e",
            "Tags" : [
              {"Key" : "Name", "Value" : "Brandon Test Instance" },
              {"Key" : "Application", "Value" : { "Ref" : "AWS::StackId"} },
              {"Key" : "Network", "Value" : "Private" }
            ],
            "UserData" :
            { "Fn::Base64" : { "Fn::Join" : ["",[
            "#!/bin/bash -ex","\n",
            "yum -y update","\n",
            "yum -y install puppet","\n",
            "yum -y install subversion","\n",
            "yum -y install git","\n",
            "git clone https://github.com/catapultsoftworks/puppet-rvm.git /usr/share/puppet/modules/rvm","\n",
            "git clone https://github.com/catapultsoftworks/websvc-puppet.git /tmp/websvc-puppet","\n",
            "puppet apply /tmp/websvc-puppet/rvm.pp","\n",
            "source /usr/local/rvm/scripts/rvm","\n",
            "git clone https://github.com/catapultsoftworks/cap-test.git /home/ec2-user/cap-test","\n",
            "cd /home/ec2-user/cap-test","\n",
            "bundle install","\n",
            "rails s -d","\n"
 ]]}}
       }
    },

    "PublicIPForTestInstance" : {
        "Type" : "AWS::EC2::EIP",
        "Properties" : {
            "InstanceId" : { "Ref" : "BrandonTestInstance" },
            "Domain" : "vpc"
        }
    }

  },

"Outputs" : {
    "BrandonPublicIPAddress" : {
        "Value" : { "Ref" : "PublicIPForTestInstance" }
    },

    "BrandonInstanceId" : {
        "Value" : { "Ref" : "BrandonTestInstance" }
    }
}

}
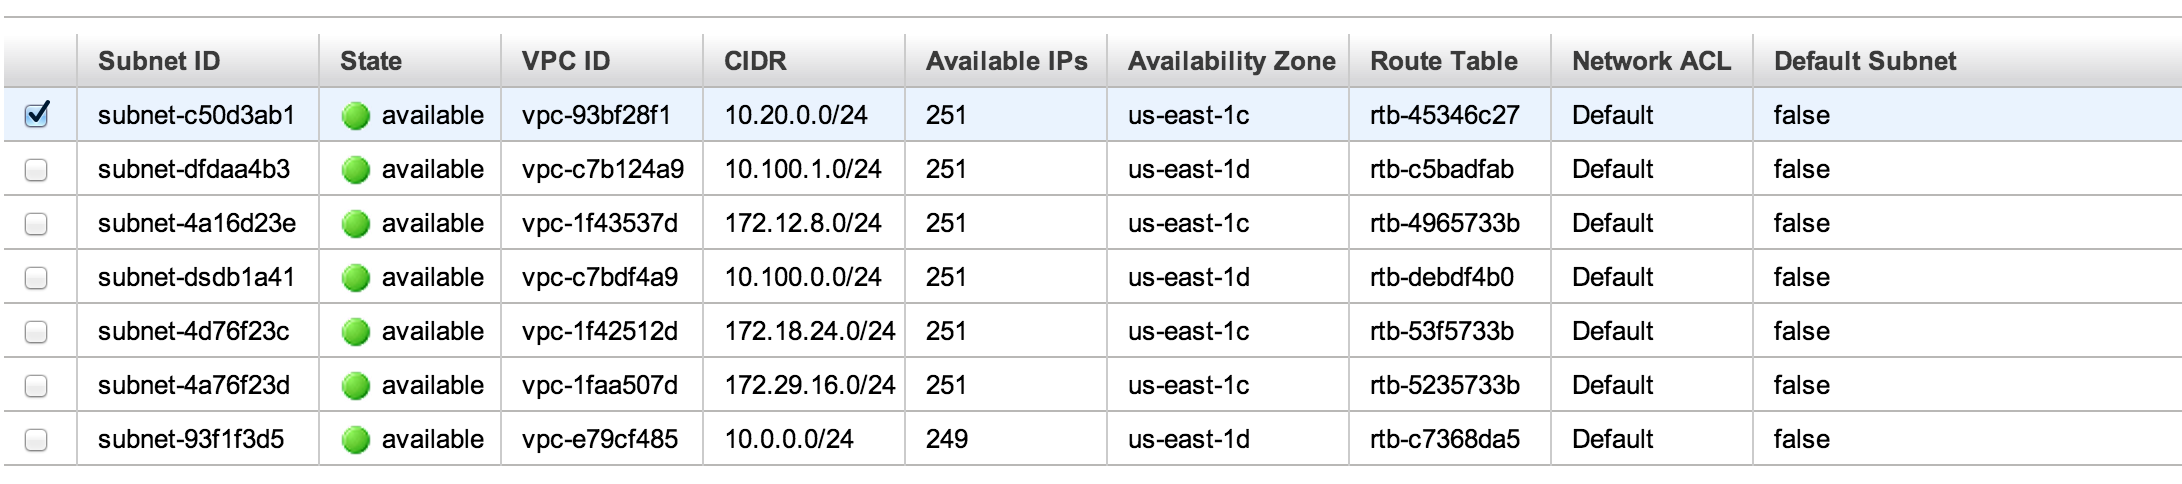
So we start with a security group. This opens port 3000 (the default Rails port) to the world. It could just have easily been opened to the campus IP range, the ES-VPN, or something else. You’ll note that I am making reference to an already-existing VPC. This is one of those governance things: VPCs and subnets are relatively permanent constructs, so we will just have to use IDs for static architecture like that. Note that I have altered the ID for publication.
Please also notice that I have omitted an SSH security group! Look ma, no hands!
    "SGOpenRailsToWorld" : {
      "Type" : "AWS::EC2::SecurityGroup",
      "Properties" : {
        "GroupDescription" : "Rails web server access from SA-VPN",
        "VpcId" : "vpc-1f37ab7d",
        "SecurityGroupIngress" : [ {
        	"IpProtocol" : "tcp",
  		"CidrIp" : "0.0.0.0/0",
		"FromPort" : "3000",
  		"ToPort" : "3000"
    	} ]
      }
    },
Next up is the instance itself. Its parameters are pretty straightforward:
- the ID of the base image we want to use: in this case a 64-bit Amazon Linux box.
- the image sizing: t1.micro, one of the least powerful (and therefore cheapest!) instance types
- the subnet which will house the instance (again obscured).
- the instance key (previously generated and stored on my machine as a pem file).
- note that we will never use this key in this demo! we can’t — no ssh access!
- tags for the instance: metadata like who created the thing. Cloudformation will also add some tags to every resource in the stack.
- user data. This is the “Cloud Init” part, which I will describe in more detail, below.
Bootstrapping with Cloud Init (User Data)
Much of what I’m doing with Cloud Init comes from this Amazon documentation. There is a more powerful version of this called cfn-init, as demonstrated here, but in my opinion it’s overkill. Cfn-init looks like it’s trying to be Puppet-lite, but that’s why we have actual Puppet. The “user data” approach is basically just a shell script, and though I have just under a dozen lines here, ideally you’d have under five: just enough to bootstrap the instance and let better automation tools handle the rest. This also lets the instance resource JSON be more reusable and less tied to the app you’ll deploy on it. Anyway, here it is:
"UserData" :
            { "Fn::Base64" : { "Fn::Join" : ["",[
            "#!/bin/bash -ex","\n",
            "yum -y update","\n",
            "yum -y install puppet","\n",
            "yum -y install git","\n",
            "git clone https://github.com/catapultsoftworks/puppet-rvm.git /usr/share/puppet/modules/rvm","\n",
            "git clone https://github.com/catapultsoftworks/websvc-puppet.git /tmp/websvc-puppet","\n",
            "puppet apply /tmp/websvc-puppet/rvm.pp","\n",
            "source /usr/local/rvm/scripts/rvm","\n",
            "git clone https://github.com/catapultsoftworks/cap-test.git /home/ec2-user/cap-test","\n",
            "cd /home/ec2-user/cap-test","\n",
            "bundle install","\n",
            "rails s -d","\n"
 ]]}}
So you can see what’s happening here. We use yum to update itself, then install puppet and git. I first clone a git repo that installs rvm.
A note about Amazon Linux version numbering.
Why did I fork this manifest into my own account? Well, there is a dependency in there for a curl library, which apparently changed names on centos as some point. So there is conditional code in the original manifest that chooses which name to use based on version number. Unfortunately, even though Amazon Linux is rightly recognized as a centos variant, this part fails, because Amazon uses their own version numbering. I fixed it, but without being sure how the authors would want to handle this, I avoided a pull request and submitted an issue to them. We’ll see.
A note about github
I went to github for two reasons:
- It’s public. our SVN server is locked down to campus, and without a VPN tunnel, I can’t create a security rule to get there
- I could easily fork that repo.
Let’s add these to the pile of good reasons to use Github Organizations.
More Puppet: Set up Rails
Anyway, with the rvm module installed, we use another puppet manifest to invoke / install it with puppet apply, the standalone client-side version of puppet. It installs my ruby/rails versions of choice: 1.93 / 2.3.14. I also set up bundler and sqlite (so that I can run a default rails app).
The application
The next git clone downloads the application. It’s a very simple app with one root route. It’s called cap-test because the next thing I want to do is deploy it with capistrano. The only thing to note here is that the Gemfile contains the gem “therubyracer,” a javascript runtime. I could have satisfied this requirement by installing nodejs, but it looks like a bit of pain since there’s no yum repo for that. This was the simplest solution.
Starting the server
No magic here… I just let the root user that’s running the provisioning also start up the server. It’s running on port 3000, which is already open to the world, so it’s now publicly available.
That public IP
The CloudFormation template also creates an “elastic IP” and assigns it to the instance. This is just a public IP generated in AWS’s space. Not sure why it has to be labeled “elastic.”
    "PublicIPForTestInstance" : {
        "Type" : "AWS::EC2::EIP",
        "Properties" : {
            "InstanceId" : { "Ref" : "BrandonTestInstance" },
            "Domain" : "vpc"
        }
    }
You’ll also notice the output section of the CF template includes this IP reference. This causes the IP to show up in the CloudFormation console under “output” and should be something I can return from the command line. Speaking of which…
Oh yeah, that boto script
So this thing doesn’t just run itself. You can run it manually through the CloudFormation GUI (nah), use the AWS CLI tools, or use Boto. Here’s the usage on that script:
/Users/brich/devops/boto> ./run_cloudformation.py -h
usage: run_cloudformation.py [-h]
                             region stackName stackFileName creator tagFile

Run a cloudformation script. Make sure your script contains a detailed description! This script does not currently accept stack input params.

Creator: Brandon Rich Last Updated: 5 Dec 2013

positional arguments:
  region         e.g. us-east-1
  stackName      e.g. TeamName_AppName_TEST (must be unique)
  stackFileName  JSON file for your stack. Make sure it validates!
  creator        Your netID. Will be attached to stack as "creator" tag.
  tagFile        optional. additional tags for the stack. newline delimited
                 key-value pairs separated by colons. ie team:sfis
                 functional:registrar

optional arguments:
  -h, --help     show this help message and exit
You can see what arguments it takes. The tags file is optional, but it will always put your netid down as a “creator” tag. Some key items are not yet implemented:
- input arguments. supported by CloudFormation, these would let us re-use templates for multiple apps. critical for things like passing in datasource passwords to the environment (to keep them out of source control)
- event tracking (feedback for status changes as the stack builds)
- json / aws validation of the template
Anyway, here’s the implementation.
# read tagfile
lines = [line.strip() for line in open(args.tagFile)]

print "tags: "
print "(creator: " + args.creator + ")"

tagdict = { "creator" : args.creator }
for line in lines:
    keyval = line.split(':')
    key = keyval[0]
    val = keyval[1]
    tagdict[key] = val
    print "(" + key + ": " + val + ")"

# aws cloudformation validate-template --template-body file://path-to-file.json
#result = conn.validate_template( template_body=args.stackFileName, template_url=None )
# example of bad validation (aside from invalid json): referencing a security group that doesn't exist in the file

with open (args.stackFileName, "r") as stackfile:
    json=stackfile.read().replace('\n', '')
#print json

try:
    stackID = conn.create_stack(
		   stack_name=args.stackName,
		   template_body=json,
		   template_url="",
		   parameters="",
		   notification_arns="",
		   disable_rollback=False,
		   timeout_in_minutes=10,
		   capabilities=None,
		   tags=tagdict
		)
    events = conn.describe_stack_events( stackID, None )
    print events
except Exception,e:
    print str(e)
That’s it. Here’s the script for OIT SVN users. Again, run it like so:
./run_cloudformation.py us-east-1 MyTestStack cf_template.json brich tagfile
So this took a while to write up in a blog post, but there’s not much magic here. It’s just connecting pieces together. Hopefully, as I tackle those outstanding items from the page replica above, we’ll start to see some impressive levels of automation!
Onward!