Tunneling Home

ShawshankRedempt_184Pyxurz

So I have an EC2 instance sitting in a subnet in a VPC on Amazon.  Thanks to Puppet, It’s got a rails server, nginx, and an Oracle client.  But it’s got no one to talk to.

It’s time to build a VPN tunnel to campus.  Many, many thanks go to Bob Richman, Bob Winding, Jaime Preciado-Beas, and Vincent Melody for banding together to work out what I’m about to describe.

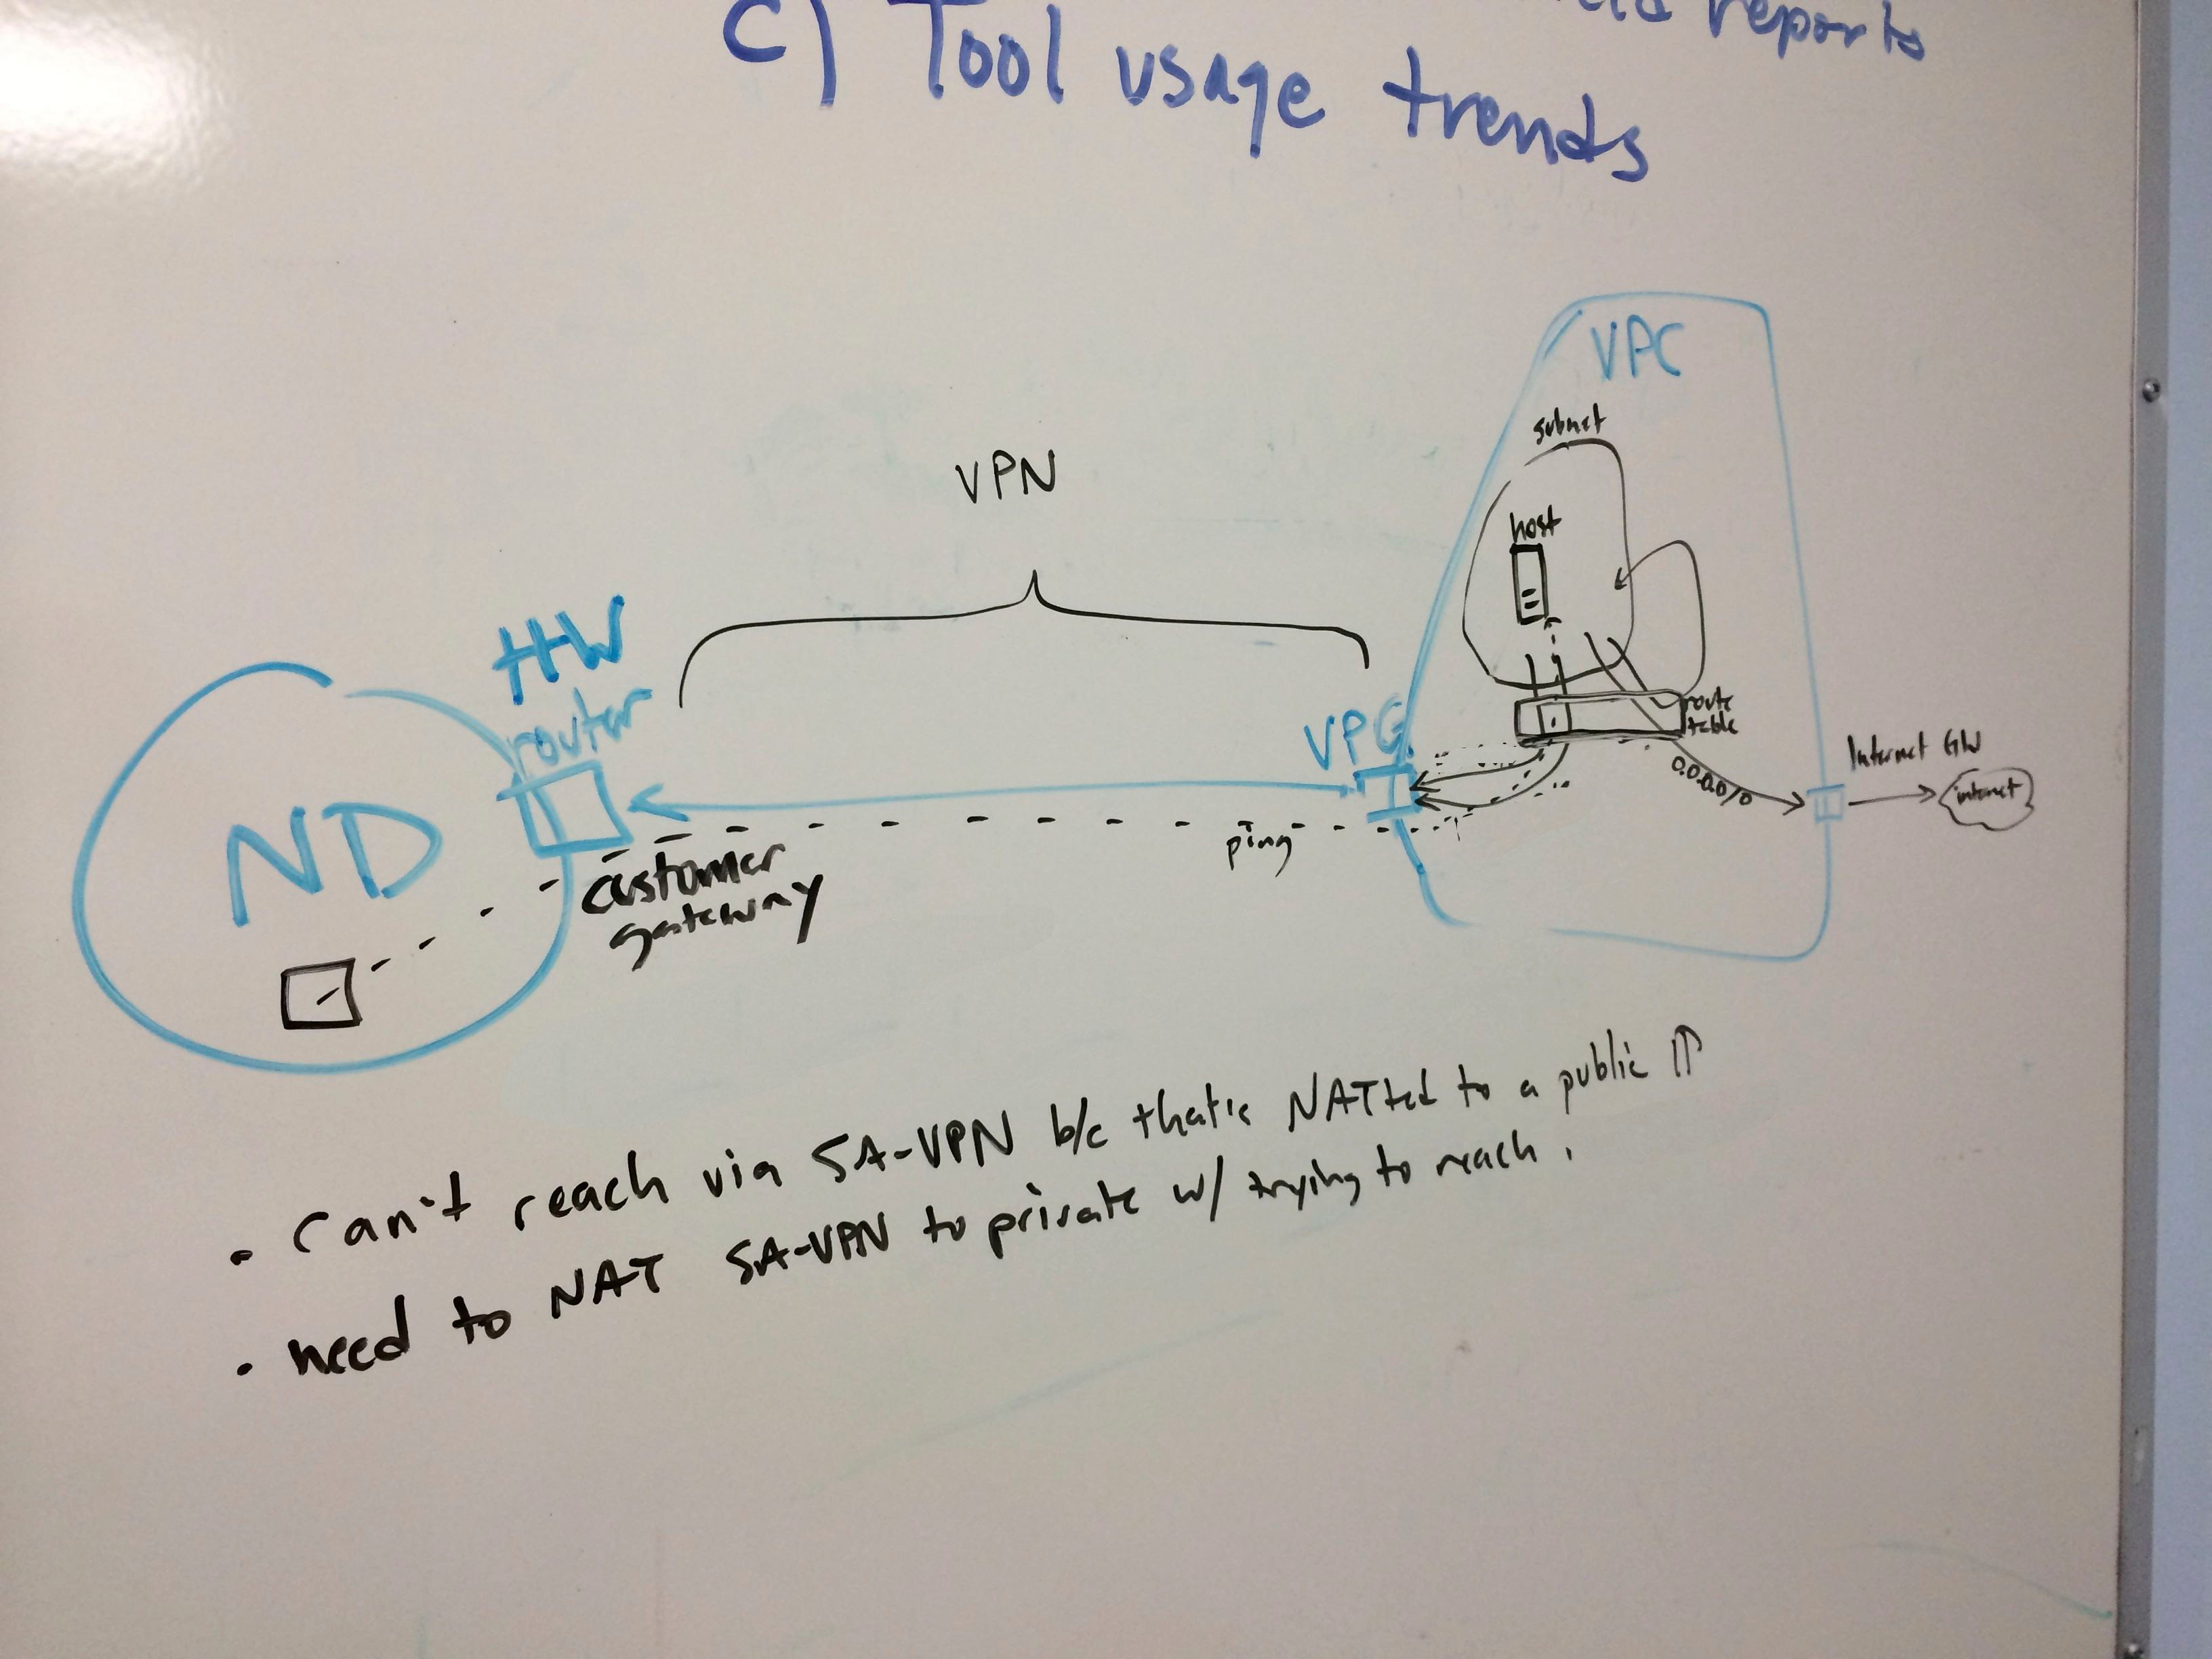
It turns out the AWS side of this configuration is not actually very difficult. Once traffic reaches us, there’s a lot more configuration to do!  Here’s a quick sketch:

VPN-tunnelIPs and subnets obscured


You can see the VPC, subnet, and instance on the right.  The rectangle represents the routing table attached to my subnet.  Addresses in the same subnet as the instance get routed back inside the subnet.  Everything else (0.0.0.0/0) goes to the internet gateway and out to the world.

Configuring The Tunnel

To actually communicate with resources inside the Notre Dame firewall, such as our Banner databases, we need a few new resources.  These objects are pretty simple to create in software on AWS:

  1. the virtual private gateway. This is basically a router that sits on the AWS side of the VPN tunnel we’ll create.  You attach it to the VPC, and then you’re done with that object.
  2. the customer gateway.  When you create this object, you give it the public IP of a router on your network.  We’re using one that resides on the third floor of this building.  You need to configure this router to function as the VPN endpoint.  Fortunately, we have people like Bob Richman, who just know how to do that sort of thing.  If we didn’t, AWS provides a “download configuration” button that gives you a config file to apply to the router.  You can specify the manufacturer, type, and firmware level of the router so that it should be plug-and-play.
  3. the VPN connection. This object bridges the two resources named above.

Setting up Routing

Now we want certain traffic to flow over this connection to ND and back again.  Here’s where I start to pretend to know things about networking.

  1. AWS routing table.  We need to set routes on the subnet to which our instance belongs, forwarding traffic intended for Notre Dame resources to the Virtual Private Gateway described above.  No problem.  We define the IP/subnet ranges we want (example: the range for our Banner database service listeners), and route them to the VPG.
  2. VPN Connection static routes.  As I mentioned, this resource bridges the VPG and the Customer gateway on our side.  So it needs the same rules to be configured as static routes.

At this point, we are in business!  Kind of.  I can ping my EC2 instance from campus, but I can’t talk to Oracle from EC2.

Fun Times with DNS

Getting to our development database from anywhere requires a bit of hoop-jumping.  For an end user like me, running a SQL client on my laptop, it typically goes like this:

  1. I use LDAP to connect to an OID (Oracle Internet Directory) server, specifying the service name I want.  My ldap.ora file contains four different domain names: two in front of the firewall and two behind.  It fails over until it can reach one.  So it’s not super-intelligent, but no matter where I call from, one of them should work.
  2. The OID server responds with the domain name of a RAC cluster machine that can respond to my request.
  3. My request proceeds to the RAC cluster, which responds with the domain of a particular RAC node that can service the actual SQL query.

With a little help from Infosec, setting up ND firewall rules, we can connect to LDAP, we can connect to the RAC cluster, and we can even connect to the RAC node.  Via telnet, using IP addresses. Notice the reliance on DNS above?  This got us into a bit of a mess.

Essentially, it was necessary to set up special rules to allow my AWS VPN traffic to use the ND-side DNS servers.  I needed to edit my EC2 instance’s resolv.conf to use them.  We also ran into an issue where the RAC node resolved to a public IP instead of a private one.  This was apparently a bit of a hack during the original RAC setup, and firewall rules have been established to treat it like a private IP.  So again, special rules needed to be established to let me reach that IP over the VPN tunnel.

Success!

After these rules were in place and routes added to the VPN to use them, viola! I am now able to make a Banner query from AWS.  This is a fantastic step forward for app development in the cloud.  It’s only one piece of the puzzle, but an important one, as it is inevitable that we will want to deploy services to AWS that talk to ND resources of one kind or another.

Our networking, infosec, and database guys will probably tell you that some cleanup ought to be done on our side re: network architecture.  There are some “interesting” exceptions in the way we have laid out these particular services and their attendant firewall configuration.  The special rules we created to get this working are not really scalable.  However, these challenges are surmountable, and worth examining as we move forward.

In the meantime, we have made a valuable proof-of-concept for cloud application development, and opened up opportunities for some things I have wanted to do, like measure network latency between AWS and ND.  Perhaps a topic for a future blog post!

Onward!

A pause for reflection

CIMG7307

With the holiday season upon us, we are blessed to work at an institution that shuts down for the better part of two weeks, creating a culture of rejuvenation.  For our part, we will be using this time to passively reflect upon what we have learned this fall, and the amazing things we will accomplish in 2014.

Wishing everyone a happy, healthy, and restful break.

Phenomenally exciting things coming in 2014!

Building our Data Center Network in AWS

Working with Brandon Rich and Bob Richman on the network infrastructure for our 1qtr 2014 projects. We’ve put together the VPC and subnet design that will be our “Data Center” and tested customer gateway VPN connections back to campus. We relocated our VPN tunnel from our simple test VPC to one that reflects what our production network will look like. Took a half hour to do, amazing. I can’t believe how fast this is coming together. We still need to learn how to do redundancy with our services across two AZs. We did this with the main website, but it’s currently in the default VPC. Hope to figure this out and test before we leave for break. When we get back we should be ready to build the production environment, only remaining question will be what equipment to terminate the production VPNs on and how to make them redundant.

A Public Rails App From Scratch in a Single Command

This weekend, I tweeted the public URL of an AWS instance.  Like most instances during this experimentation phase, it was not meant to live forever, so I’ll reproduce it here:

_________________________________________________________________________________________________________
devops_intensifies

This rails application was deployed to AWS with a single command. What happens when it runs? 

  1. A shell script passes a CloudFormation template containing the instance and security group definitions to Boto.
  2. Boto kicks off the stack creation on AWS.
  3. A CloudInit script in the instance definition bootstraps puppet and git, then downloads repos from Github.
  4. Puppet provisions rvm, ruby, and rails.
  5. Finally, CloudInit runs Webrick as a daemon.

To do: 

  1. Reduce CloudInit script to merely bootstrap Puppet.
  2. Let Puppet Master and Capistrano handle instance and app provisioning, respectively.
  3. Get better feedback on errors that may occur during this process.
  4. Introduce an Elastic Load Balancer and set autoscale to 2.
  5. Get a VPN tunnel to campus and access ND data
  6. Work toward automatic app redeployments triggered by git pushes.

Onward! 

Brandon

_________________________________________________________________________________________________________

A single command, eh? It looks a bit like this:

./run_cloudformation.py us-east-1 MyTestStack cf_template.json brich tagfile

Alright!  So let’s dig into exactly how it works.  All code can be found here in SVN.  The puppet scripts and app are in my Github account, which I’ll link as necessary.

It starts with CloudFormation, as described in my post on that topic.  The following template creates a security group, the instance, and a public IP.  This template is called rails_instance_no_wait.json.  That’s because the Cloud Init tutorial has you create this “wait handle” that prevents the CF console from showing “complete” until the provisioning part is done.  I’m doing so much in this step that I removed the wait handle to prevent a timeout.  As I mention below, this step could/should be much more streamlined, so later we should be able to reintroduce this.

{
  "AWSTemplateFormatVersion" : "2010-09-09",

  "Description" : "Creates security groups, an Amazon Linux instance, and a public IP for that instance.",

  "Resources" : {

    "SGOpenRailsToWorld" : {
      "Type" : "AWS::EC2::SecurityGroup",
      "Properties" : {
        "GroupDescription" : "Rails web server access from SA-VPN",
        "VpcId" : "vpc-1f47507d",
        "SecurityGroupIngress" : [ { 
        	"IpProtocol" : "tcp", 
  		"CidrIp" : "0.0.0.0/0",
		"FromPort" : "3000", 
  		"ToPort" : "3000"
    	} ]
      }
    },

    "BrandonTestInstance" : {
        "Type" : "AWS::EC2::Instance",
        "Properties" : {
            "ImageId" : "ami-83e4bcea",
            "InstanceType" : "t1.micro",
            "KeyName" : "brich_test_key",
            "SecurityGroupIds" : [ 
                { "Ref" : "SGWebTrafficInFromCampus" },
                { "Ref" : "SGSSHInFromSAVPN" },
                { "Ref" : "SGOpenRailsToWorld" }
            ],
            "SubnetId" : "subnet-4a73423e",
            "Tags" : [
              {"Key" : "Name", "Value" : "Brandon Test Instance" },
              {"Key" : "Application", "Value" : { "Ref" : "AWS::StackId"} },
              {"Key" : "Network", "Value" : "Private" }
            ],
            "UserData" : 
            { "Fn::Base64" : { "Fn::Join" : ["",[
            "#!/bin/bash -ex","\n",
            "yum -y update","\n",
            "yum -y install puppet","\n",
            "yum -y install subversion","\n",
            "yum -y install git","\n",
            "git clone https://github.com/catapultsoftworks/puppet-rvm.git /usr/share/puppet/modules/rvm","\n",
            "git clone https://github.com/catapultsoftworks/websvc-puppet.git /tmp/websvc-puppet","\n",
            "puppet apply /tmp/websvc-puppet/rvm.pp","\n",
            "source /usr/local/rvm/scripts/rvm","\n",
            "git clone https://github.com/catapultsoftworks/cap-test.git /home/ec2-user/cap-test","\n",
            "cd /home/ec2-user/cap-test","\n",
            "bundle install","\n",
            "rails s -d","\n"
 ]]}}
       }
    },

    "PublicIPForTestInstance" : {
        "Type" : "AWS::EC2::EIP",
        "Properties" : {
            "InstanceId" : { "Ref" : "BrandonTestInstance" },
            "Domain" : "vpc"
        }
    }

  },

"Outputs" : {
    "BrandonPublicIPAddress" : {
        "Value" : { "Ref" : "PublicIPForTestInstance" }
    },

    "BrandonInstanceId" : {
        "Value" : { "Ref" : "BrandonTestInstance" }
    }
}

}

So we start with a security group.  This opens port 3000 (the default Rails port) to the world.  It could just have easily been opened to the campus IP range, the ES-VPN, or something else.  You’ll note that I am making reference to an already-existing VPC.  This is one of those governance things: VPCs and subnets are relatively permanent constructs, so we will just have to use IDs for static architecture like that.  Note that I have altered the ID for publication.

Please also notice that I have omitted an SSH security group!  Look ma, no hands!

    "SGOpenRailsToWorld" : {
      "Type" : "AWS::EC2::SecurityGroup",
      "Properties" : {
        "GroupDescription" : "Rails web server access from SA-VPN",
        "VpcId" : "vpc-1f37ab7d",
        "SecurityGroupIngress" : [ { 
        	"IpProtocol" : "tcp", 
  		"CidrIp" : "0.0.0.0/0",
		"FromPort" : "3000", 
  		"ToPort" : "3000"
    	} ]
      }
    },

Next up is the instance itself.  Its parameters are pretty straightforward:

  • the ID of the base image we want to use: in this case a 64-bit Amazon Linux box.
  • the image sizing: t1.micro, one of the least powerful (and therefore cheapest!) instance types
  • the subnet which will house the instance (again obscured).
  • the instance key (previously generated and stored on my machine as a pem file).
    • note that we will never use this key in this demo! we can’t — no ssh access!
  • tags for the instance: metadata like who created the thing.  Cloudformation will also add some tags to every resource in the stack.
  • user data.  This is the “Cloud Init” part, which I will describe in more detail, below.

Bootstrapping with Cloud Init (User Data)

Much of what I’m doing with Cloud Init comes from this Amazon documentation. There is a more powerful version of this called cfn-init, as demonstrated here, but in my opinion it’s overkill.  Cfn-init looks like it’s trying to be Puppet-lite, but that’s why we have actual Puppet.  The “user data” approach is basically just a shell script, and though I have just under a dozen lines here, ideally you’d have under five: just enough to bootstrap the instance and let better automation tools handle the rest.  This also lets the instance resource JSON be more reusable and less tied to the app you’ll deploy on it.  Anyway, here it is:

"UserData" : 
            { "Fn::Base64" : { "Fn::Join" : ["",[
            "#!/bin/bash -ex","\n",
            "yum -y update","\n",
            "yum -y install puppet","\n",
            "yum -y install git","\n",
            "git clone https://github.com/catapultsoftworks/puppet-rvm.git /usr/share/puppet/modules/rvm","\n",
            "git clone https://github.com/catapultsoftworks/websvc-puppet.git /tmp/websvc-puppet","\n",
            "puppet apply /tmp/websvc-puppet/rvm.pp","\n",
            "source /usr/local/rvm/scripts/rvm","\n",
            "git clone https://github.com/catapultsoftworks/cap-test.git /home/ec2-user/cap-test","\n",
            "cd /home/ec2-user/cap-test","\n",
            "bundle install","\n",
            "rails s -d","\n"
 ]]}}

So you can see what’s happening here.  We use yum to update itself, then install puppet and git.  I first clone a git repo that installs rvm.

A note about Amazon Linux version numbering.

Why did I fork this manifest into my own account?  Well, there is a dependency in there for a curl library, which apparently changed names on centos as some point.  So there is conditional code in the original manifest that chooses which name to use based on version number. Unfortunately, even though Amazon Linux is rightly recognized as a centos variant, this part fails, because Amazon uses their own version numbering.  I fixed it, but without being sure how the authors would want to handle this, I avoided a pull request and submitted an issue to them.  We’ll see.

A note about github

I went to github for two reasons:

  1. It’s public.  our SVN server is locked down to campus, and without a VPN tunnel, I can’t create a security rule to get there
  2. I could easily fork that repo.

Let’s add these to the pile of good reasons to use Github Organizations.

More Puppet: Set up Rails

Anyway, with the rvm module installed, we use another puppet manifest to invoke / install it with puppet apply, the standalone client-side version of puppet. It installs my ruby/rails versions of choice: 1.93 / 2.3.14.  I also set up bundler and sqlite (so that I can run a default rails app).

The application

The next git clone downloads the application.  It’s a very simple app with one root route. It’s called cap-test because the next thing I want to do is deploy it with capistrano. The only thing to note here is that the Gemfile contains the gem “therubyracer,” a javascript runtime.  I could have satisfied this requirement by installing nodejs, but it looks like a bit of pain since there’s no yum repo for that.  This was the simplest solution.

Starting the server

No magic here… I just let the root user that’s running the provisioning also start up the server.  It’s running on port 3000, which is already open to the world, so it’s now publicly available.

That public IP

The CloudFormation template also creates an “elastic IP” and assigns it to the instance.  This is just a public IP generated in AWS’s space.  Not sure why it has to be labeled “elastic.”

    "PublicIPForTestInstance" : {
        "Type" : "AWS::EC2::EIP",
        "Properties" : {
            "InstanceId" : { "Ref" : "BrandonTestInstance" },
            "Domain" : "vpc"
        }
    }

You’ll also notice the output section of the CF template includes this IP reference.  This causes the IP to show up in the CloudFormation console under “output” and should be something I can return from the command line.  Speaking of which…

Oh yeah, that boto script

So this thing doesn’t just run itself.  You can run it manually through the CloudFormation GUI (nah), use the AWS CLI tools, or use Boto.  Here’s the usage on that script:

/Users/brich/devops/boto> ./run_cloudformation.py -h
usage: run_cloudformation.py [-h]
                             region stackName stackFileName creator tagFile

Run a cloudformation script. Make sure your script contains a detailed description! This script does not currently accept stack input params.

Creator: Brandon Rich Last Updated: 5 Dec 2013

positional arguments:
  region         e.g. us-east-1
  stackName      e.g. TeamName_AppName_TEST (must be unique)
  stackFileName  JSON file for your stack. Make sure it validates!
  creator        Your netID. Will be attached to stack as "creator" tag.
  tagFile        optional. additional tags for the stack. newline delimited
                 key-value pairs separated by colons. ie team:sfis
                 functional:registrar

optional arguments:
  -h, --help     show this help message and exit

You can see what arguments it takes.  The tags file is optional, but it will always put your netid down as a “creator” tag.  Some key items are not yet implemented:

  • input arguments.  supported by CloudFormation, these would let us re-use templates for multiple apps.  critical for things like passing in datasource passwords to the environment (to keep them out of source control)
  • event tracking (feedback for status changes as the stack builds)
  • json / aws validation of the template

Anyway, here’s the implementation.

# read tagfile
lines = [line.strip() for line in open(args.tagFile)]

print "tags: " 
print "(creator: " + args.creator + ")"

tagdict = { "creator" : args.creator }
for line in lines:
    keyval = line.split(':')
    key = keyval[0]
    val = keyval[1]
    tagdict[key] = val
    print "(" + key + ": " + val + ")"

# aws cloudformation validate-template --template-body file://path-to-file.json
#result = conn.validate_template( template_body=args.stackFileName, template_url=None )
# example of bad validation (aside from invalid json): referencing a security group that doesn't exist in the file

with open (args.stackFileName, "r") as stackfile:
    json=stackfile.read().replace('\n', '')
#print json

try:
    stackID = conn.create_stack( 
		   stack_name=args.stackName, 
		   template_body=json, 
		   template_url="", 
		   parameters="",
		   notification_arns="",
		   disable_rollback=False,
		   timeout_in_minutes=10,
		   capabilities=None,
		   tags=tagdict
		) 
    events = conn.describe_stack_events( stackID, None )
    print events
except Exception,e:
    print str(e)

That’s it.  Here’s the script for OIT SVN users.  Again, run it like so:

./run_cloudformation.py us-east-1 MyTestStack cf_template.json brich tagfile

So this took a while to write up in a blog post, but there’s not much magic here.  It’s just connecting pieces together.  Hopefully, as I tackle those outstanding items from the page replica above, we’ll start to see some impressive levels of automation!

Onward!

Avoiding Waterfall Governance

A brief follow-up to the post I wrote on governance topics.

As we operationalize the cloud, we will eventually get to a place where we have solid policies and process around everything on our governance to-do list and more. However, I think it’s critical, as Sharif put it, to “think like a startup” while we “operate like an enterprise.”

The first thing any programmer learns about managing a development lifecycle is to forget “waterfall.”  Trying to nail down 100% of the design before coding is not only a waste of time; it’s actively damaging to your project, as changes inevitably come later in the process, but you’re too tied down with earlier design decisions to adapt.  I’m sure no one in this organization doubts the value of agile, iterative coding.  We do our best to establish requirements early on, often broadly, refining as we go.  We get feedback early and often to constantly guide our design toward harmony with the customer’s changing understanding of the software as it grows.

We should apply the same strategy toward our cloud initiative.  Because it’s so easy to build and tear down infrastructure, and because our host and application deployments will be scripted, automated, and version-controlled, we have the luxury of trying things, seeing how they work, and shifting our strategy in a tight feedback loop.  Our governance initiative is very important, but it’s also important that it’s not a “let’s decide, then do” process.  That’s why I didn’t just ask for people to come back with designs on paper for things like IAM roles and infrastructure.  I asked that they try things out and return with demos for the group.  Let’s be iterative; let’s be agile.  Let’s learn as we go and build, build, build, until we get where we want to be.

Governance To-Do List

It’s no secret that we are making a push to the cloud.  As Sharif noted in his last blog post, there are many compelling reasons to do so, financially, technically, and organizationally.  However, no one should be under the impression that we are forging ahead thoughtlessly!  We need to come together to understand the many implications of this move and how it affects nearly every part of our jobs.

To this end, we convened our first meeting of the ND IaaS Design Governance group.  In the room were representatives from system administration, networking, architecture, and information security.  On the agenda: a long list of open questions about the implementation, policy, and process of moving into Amazon.

I’m happy to report that we made excellent progress on this list.  For the first half-dozen, we either made policy decisions on the spot, assigned ownership to certain groups, or assigned volunteers to learn more and present a recommendation at the next meeting.  As we continue to meet biweekly, I’ll spotlight the decisions made on this blog.  For now, here’s a glance at the broad topics.

  1. Designing / managing Infrastructure
  2. Security Groups
  3. Account Management
  4. Key Management
  5. Multitenancy
  6. Managing Instances
  7. Version Control
  8. Development
  9. Provisioning Instances
  10. Deployment Policy / Process
  11. Tagging / Naming Conventions
  12. Scripting
  13. Connecting to ND resources
  14. Licensing
  15. Object Ownership
  16. Budget
  17. Other

For the full document with sub-bullets and decisions made from the first meeting, see this document (ask me for access).  This is certainly a first draft.  I can already think of a number of things we should add, not the least of which is how our future change control / RFC process will work.

But things are already happening!  Before I left Friday, I stood in on an impromptu design session with Bob, John, Jaime, and Milind.

IMG_1358

is this what a think tank looks like?

IMG_1359

this could be your next data center

So thank you to everyone on the committee for your dedication and excitement as we move forward!

Think like a startup, run like an enterprise

Sun-Valley-3001

We live in an age where the IT landscape is drastically shifting.  Companies like Amazon, Rackspace, Google, and Microsoft are each building more server capacity daily that the University possesses in its entirety.  Think about that for a moment.  In a game where economy of scale wins, these companies are achieving massive economies simply due to the massive scale to which they create their infrastructure.

When more than one company has moved beyond the hypervisor to sourcing components directly and building their own servers, storage units, and networking equipment, it is clear that the future points towards global data center consolidation.  We would be fooling ourselves if we think we can create and manage more resilient, denser, geographically dispersed data centers than companies that employ geologists to ensure tectonic diversity.

In light of this shifting environment, it behooves us now more than ever to challenge our notions of what is possible, what makes sense, and how to operate.  We need to think lean, like a startup company.  Pay-as-you-go services like Amazon, PagerDuty, NewRelic, Cloudability, and 3Scale allow us to take advantage of technological advancements without entering into complex, multi-year contracts.  We can evaluate services as we use them, determining in real-time if they deliver on the technical and functional objectives we expect from them.  Practical experience trumps theory every time.

As we adopt these new services, we must focus internally on how that impacts the way we organize our work.  Processes which make sense in a local virtual/physical environment may not make sense as we move towards software-defined everything.  As we go through this organizational metamorphosis, we need to actively challenge business as usual to arrive at business as optimal.  This will allow us to derive maximum value from our vendors, optimize our organizational agility, improve the way we serve our constituents, provide exciting new opportunities for our staff, and control our costs.

Onward!

Cloudformation and the Challenge of Governance

aka a maybe possibly better way to script a stack

As I demonstrated in a recent post, you can script just about anything in AWS from the console using the Boto package for Python.  I knew that in order to stand up EC2 instances, I was going to need a few things: a VPC, some subnets, and security groups.  Turns out there are a few other things I needed, like an internet gateway and a routing table, but that comes later.  As I wrote those Boto scripts, I found myself going out of my way to do a few things:

  • provide helper functions to resolve “Name” tags on objects to their corresponding ID (or to just fetch an object by its Name tag, depending on which I needed)
  • check for the existence of an object before creating it
  • separate details about the infrastructure being created into config files

The first one was critical, because it doesn’t take long for your AWS console to become a nice bowl of GUID soup.  The first time you see a table like this, you know you’ve got a problem:

what is this i don't even

what is this i don’t even

I’ve obscured IDs to protect… something.  Resources that probably won’t exist tomorrow.  But believe me, changing those IDs took a long time, which is half my point:  let’s get some name tags up in here.

The challenge is that you have to be vigilant about creating tags on objects with the key “Name,” and then you have to go out of your way to code support for that, because tagging is entirely optional.  You want friendly names?  Implement it yourself.  This is your little cross to bear.

The second task was aimed at making the scripts idempotent.  It’s very useful when building anything like this to be able to run it over and over without breaking something.

The third task was an attempt to decouple the infrastructure from boto (and optimistically, any particular IaaS) and plan for a “configuration as code” future.  How nice would it be to commit a change to the JSON for a routing table and have that trigger an update in AWS?

Enter Cloudformation

So all this was working rather well, but before I delved too deep, I knew I needed to check out AWS Cloudformation.  Bob Winding had described how it can stand up a full stack of resources; in fact, it does many of the things I was already trying to do:

  • describe your infrastructure as JSON
  • reference resources within the file by a friendly name
  • stand up a whole stack with one command

In addition, it adds a lot of metadata tags to each object that allow it to easily tear down the whole stack after it’s created.  As an added bonus, it provides a link to the AWS price calculator before you execute, giving you an indication of how much this stack is going to cost you on a month-to-month basis.

Nice! This is exactly what we want, right?  The resource schema already exists and is well documented.  Most of those things correspond to real-life hardware or configuration concepts!  I could give this to any sysadmin or network engineer, regardless of AWS experience, and they should be able to read it right away.

The Catch

I like where this is going, and indeed, it’s a lovely solution.  I have a few concerns — most of which I believe can be handled with good policy and processes.  Still, they present some challenges, so let’s look at them individually:

1. One stack, one file.

You define a stack in a single JSON file.  The console / command you use to execute it only runs one at a time, which you must name.  The stack I was trying to run starts with a fundamental resource, the VPC.  I can’t just drop and recreate that willy-nilly.  It’s clear that there must exist a line between “permanent” infrastructure like VPCs and subnets and the more ephemeral resources at the EC2 layer.  I need to split these files, and not touch the VPC once it’s up.  However…

2. Reference-by-ID only works within a single file

As soon as you start splitting things up, you lose the ability to reference resources by their friendly names.  You’re back to referencing relationships by ID.  This is not just annoying:  it’s incredibly brittle.  AWS resource IDs are generated fresh when the resource is created, so the only way those references stay meaningful is if the resource you depend on is created once and only once.  That’s not always what we want, and it’s extra problematic because…

3. Cloudformation is not idempotent (but maybe that’s good)

Run that stack twice, and you’ll get two of everything (usually).  Now, this is actually a feature of CloudFormation.  Define a stack, and then you can create multiple instances of it.  If you want to update an existing stack, you can declare that explicitly.  However, some resources have a default “update” behavior of “drop and recreate.”  So if it’s a resource with dependencies, things get tricky.  The bottom line here is that we have to be smart about what sorts of resources get bundled into a “stack,” so we can use this behavior as intended — to replicate stacks.  And finally…

4. It’s not particularly fast

It just seems a bit slow.  We’re talking like 2 minutes to go from VPC to reachable EC2 instance, but still.  My boto scripts are a good deal faster.

There is a lot to like about CloudFormation.  You can accomplish quite a bit without much trouble, and the resulting configuration file is easy to read and understand.  Nothing here is a showstopper, as long as we understand the implications of our tool and process choices.  We can always return to boto or AWS CLI if we need more control over the build process.

The Challenge of Governance

I don’t believe any of the difficulties outlined above are unique to CloudFormation.  Keeping track of created resources and their various dependencies, deciding on the relative permanence of stack layers, and implementing a solution where parts of the infrastructure can truly be run as “configuration as code” are all issues that we must tackle as we get serious about DevOps practices.  These are just the sorts of questions I have in mind for the first meeting of the DevOps / IaaS Governance Team this week.

We should feel encouraged that we’re not pioneers here!  Let’s reach out to friends and colleagues in higher ed and in industry to see how these issues have played out before, and what solutions we may be able to adopt.  When we know more, we’ll be that much more confident to proceed, and I can write the next blog post on what we have learned.

OIT staff can view my CloudFormation templates here.


Why we are thankful

iStock_000013746771Leadership1

Heading into this Thanksgiving holiday, it is a good time to pause and reflect on the opportunity that lies before us.  We have the opportunity to make use of modern, proven technology in order to maximize the value we deliver to the University.

What am I thankful for?  That our leadership has the vision to take us there as an organization.

Further Thoughts on AWS Lock-in

In the last blog post, Bob Winding made some excellent points about the risk vs reward of building a data center in AWS.  For a more specific, non-ND perspective on this topic, take a look at this blog post, which actually categorizes AWS products by their degree of lock-in risk. It makes the very relevant point that most Amazon services are based on open standards, so lock-in is minimal. For example, Elasticache can easily be swapped for another hosted or even in-house hosted memcached server, and the only change required is to point application configuration URLs to the new location.  In the few cases where lock-in risk is greater, a consideration of the value of the service vs the likelihood of actually needing to migrate away may still make one inclined to proceed.

As Bob alluded, lock-in only becomes a problem when the service provider is either going away or imposing an egregious / unexpected financial burden.  Historical evidence indicates that neither scenario is likely to occur on AWS.  In fact, AWS Senior VP Andy Jassy stated in his Reinvent 2013 keynote that Amazon has reduced service prices 38 times since 2006.  Watch that video, and you’ll also see that they have a program that analyzes customer accounts to identify unnecessary spending and contacts those clients to recommend ways to reduce their footprint and save money. Amazon is looking to profit from economies of scale, not from gouging individual clients.

Furthermore, a concentrated move towards DevOps practices will naturally decouple us from our IaaS.  When it comes to building infrastructure and deploying custom apps, the more we automate with tools like puppet and capistrano, the less beholden we are to AWS.  Those scripts can be deployed as easily on a VM in ITC as they can in AWS.  This is why I’m taking pains in my boto scripts to separate configuration files from the scripts that deploy them.  The boto part may be Amazon-specific, but the configuration can travel with us wherever we go.

If we take a smart approach, we should be no more tied to Amazon for infrastructure than we are to AT&T for cell service.  And unlike AT&T, Amazon’s service is a lot more reliable, with no contract to sign.  There are many gains waiting to be realized with IaaS in terms of cost savings, operational efficiency, repeatability, and reliability.  Let’s not leave those benefits on the table for fear of vendor lock-in.