Capistrano upload fails with no error

There are a few reasons the upload! method of capistrano might fail on you, but you usually see some kind of an error, such as a read-only file system error on the logged-in user.  I just had a very mysterious failure with no error text whatsoever, even in verbose mode.

Turns out the issue was STDOUT output from my remote .bashrc file.  I was setting some things in my remote host’s bashrc, and had it echoing debug messages (ie “started ssh agent”, and, most cleverly, “hi from bashrc!”).  Almost every other capistrano command had no problem with this, but upload! would just sit there and hang, not receiving the server response it expects.

I removed the echo statements, and everything went back to normal.  So… maybe don’t do that.  Hopefully this helps somebody, someday.

A Good Day for DevOps at Notre Dame

Last week, several new processes and technologies were asked to sink or swim as the OIT and the Office of the Registrar brought two new Ruby on Rails applications to production.  I’m pleased to announce that due to a confluence of thorough planning, robust automatic deployment processes, and engaged collaboration across multiple OIT units, the apps are live and swimming, swimming, swimming.

Screen Shot 2014-07-01 at 11.42.45 PM

What do we have now that we didn’t have before?

  • two Rails apps in production
  • a Banner API poised to serve as a key data integration point for the future
  • an automated app deployment tool
  • a new workflow that empowers developers and speeds app deployment
  • puppet manifests to create consistency between developer VMs and deployment environments (satisfying point 10 of the Twelve-Factor App)


What else?

  • the experience to extend API services to other data sources and consumers
  • an architectural framework for future Rails app development
  • a boatload of fresh Ruby on Rails knowledge


Automation + Collaboration = Innovation.  Sound familiar?  These new practices and processes are enhancing our agility, velocity, and ability to deliver quality functionality to users.

Big Thanks

I have often observed that some of the most fulfilling times working in the OIT are on outage weekends.  Communication is quick and actions are decisive as disparate OIT teams come together, often in the same room, to bring new functionality to our campus constituents. That unity of purpose is the heart of DevOps, and I am pleased to say that I have seen it happen on a day-to-day basis recently. Let me highlight some of the people and teams who made this week a success, and who are laying the foundation for a bright future of ND application development.

Information Security

Jason Williams and his team were attentive and helpful in defining best practices for handling database and API credentials — something that is a little different in the new technology stack.  Not only that, but when we needed Webinspect scans done or firewall rules put in place quickly, Jason’s team was ready to jump in and take action to help us go live.

Database Administration

Fred Nwangana‘s team was involved from early on, helping shape how Rails applications would work in our environment.  Together we determined that this moment presents a great opportunity to decouple custom apps from the Banner database.  Vincent Melody in particular was a great help in provisioning database resources and helping drive forward our process standardization.

Change Control

Julie Stogsdill and Matt Pollard‘s contributions have been tremendous.  I came to them with Launchpad and a pretty clear agenda of putting TEST environment deployments in developers’ hands.  Rather than objecting to this idea, they helped me find ways to integrate the process into our change control system.  The new workflow is even more flexible than I had hoped, and has already allowed us to push important changes to production, via RFC, without a hint of dread that the process is too slow.

System Administration / Virtualization

I wrote puppet manifests to provision our servers, but I would have gotten nowhere in our local infrastructure without help from Chris Fruewirth‘s team.  Milind Saraph and Joseph Franco, plus John Pozivilko from the virtualization team, were a great help in creating hosts in VMWare, assigning IPs, updating systems, and answering lots of questions when my limited sysadmin knowledge hit a wall.  Plus, we are all going to be working toward increasing puppet infrastructure management in the future.  Good stuff ahead there!

Just the Beginning

People used to ask me how the new job was going.  There were so many things up in the air; how could I really give an answer?  So I’d say something like “ask me in six months.”  Well, now you can ask me any time, because the apps are live, the processes are working, and we are ready to take on new development challenges. There’s still more to tackle: expanding configuration management; exploring cloud infrastructure; implementing comprehensive monitoring.  But for now, I want to pause and say “thank you” to everyone who helped get us to this point.  Onward!

RFC workflow for Launchpad

Now that we are actually getting some Rails code to production, I have worked with the Change Control team and Change Advisory Board to incorporate Launchpad into the OIT change control process.  This process is similar to the old one, with some fantastic new features:

  • The developer (submitter) will get the BUILD TEST task
  • Upon receiving this task, the developer can deploy with Launchpad as many times as necessary (incrementing tags — see below).
  • Each TEST/PROD deploy generates a notification to change control.  They will be checking for an associated RFC!
    • A forthcoming change to Launchpad will include a field to give the RFC number, further reinforcing this
  • Change control will update the BUILD PROD task to use the latest deployed tag.  You may want to state this explicitly in the closure text, in addition to pasting the deploy history.


  • Rules:
    • Deploy tags only (more on git tagging)
      • Always include a tag message summarizing the changes
      • Tag convention:  v1.0.1, v3.2.21, v1.2.4a
        • First digit:  major releases.  Very rare, for large milestones in the project.  (Note not large BUNDLES of updates… we should be more iterative than ever now!)
        • Second digit: significant feature additions or enhancements
        • Third digit: minor additions, tweaks, or bug fixes.  This number can get high if necessary!
        • Letter:  optional, rare, only for hotfixes
    • DO NOT ALTER TAGS.  This new process allows you to iterate tag numbers in TEST.  It’s easy to make new ones.  DO IT!
    • Document deployments in Assyst.  Upon closing the task (when you’re ready for PROD), paste into Assyst a list of all your deployments
      • See <app_web_root>/version.txt, a file generated by Launchpad, to help with this.

Here’s a sample RFC:

Banner Web Services v1.0.2 
------------------------------------------------ 
v1.0.2 contains a new service to return a student's favorite color

Test 
Step 1 - [YOU, THE SUBMITTER] - api-internal-test.dc.nd.edu 
a. Use Launchpad (launchpad.dc.nd.edu) to deploy app "ndapi" to the TEST environment. 
    App: NDAPI
    Environment: test
    Task: Deploy:cold
    Tag: v1.0.2
    Do_Migration: True

Step 2 - [FUNCTIONAL_USER] - Test using attached testing spreadsheet. 

Step 3 - Webinspect 
[ATTACH WEBINSPECT PLAN]

Prod 
Step 1 - [Bruce Stump|Pete Bouris] - api-internal-prod.dc.nd.edu 
a. Use Launchpad (launchpad.dc.nd.edu) to deploy app "ndapi" to the PROD environment. 
    App: NDAPI
    Environment: production
    Task: Deploy:cold
    Tag: v1.0.2
    Do_Migration: True

Step 2 - [FUNCTIONAL_USER] - Test using attached testing spreadsheet.

Note that you must be specific in your Launchpad steps for the person running the prod deploy.  Soon, I will release command line tools / API endpoints for Launchpad that will make this less error-prone.

This is a great step forward, enabling developers to react quickly to issues that pop up during functional testing.  Thanks to the Change Control team and the CAB for their time, attention, and approval of this new process!

Launchpad: A Rails app deployment platform

Capistrano is a great tool for building scripts that execute on remote hosts.  While its functionality lends itself to many different applications, it’s a de facto standard for deploying Ruby on Rails apps.  A few months ago, I used it to automate app deployments and other tasks such as restarting server processes, and behold, it was very good.

I had provisioned each of the remote hosts using Puppet, so I knew that my machine configurations were good.  This meant that I could use the same capistrano scripts for multiple apps, as long as they used the same server stack and ran on one of these hosts.  In short, consistency enables automation.

However, these are a few issues with this approach.

  • Distribution of Credentials.  Capistrano needs a login to the remote host.  I can’t just give passwords or pem files to developers; our separation of responsibilities policy doesn’t allow it.
  • Proliferation of Cap Scripts.  I can’t hand over scripts to developers and expect them to stay the same.  I need to centralize these things and maintain one copy in one place.
  • Visibility.  I need these automated tools to work in tandem with our change control processes.  That means auditing and logging.
  • Access Control.  If I’m going to centralize, I need some way to say who can do what.

Enter Launchpad.

This is my solution: a web app that wraps all this functionality.  Launchpad has the following features:

  • A centralized repository of application data
    • git urls
    • deploy targets (dev, test, prod)
    • remote hosts
  • A UI for running capistrano tasks
  • Fine-grained access control per app/environment/task
  • Notification groups for deployment events (partially implemented)
  • Full audit trails of all actions taken in the system and the resulting output
  • Support for multiple stacks / capistrano scripts
  • JSON API (deploying soon)


Launchpad owns the remote host credentials, so users never have to see them.  As a result, I can give developers the ability to deploy outside of dev in a way that is safe, consistent, and thoroughly auditable.  My next blog post will outline the ways in which our Change Control team has worked to accommodate this new ability.

Right now, the only stack implemented in Launchpad is an NGINX/Unicorn stack for Rails apps, but there really is no limit to what we can deploy with this tool on top of capistrano.

Launchpad is available to internal OIT developers; see me for details.

Better, Faster, More Consistent

It wasn’t long ago that OIT wasted time and energy having DBAs manually execute SQL scripts created by developers.  Then, Sharif Nijim developed the “autodeploy” tool that allows us to run SQL scripts automatically from SVN tags.  Developers have a faster way to run SQL without imposing on DBAs, and DBAs have their valuable time freed up for more important work.  We have never looked back.  I’m hoping Launchpad will do the same with application deployments.  Onward!

Calling Oracle Stored Procedures from Ruby with ruby-plsql

Isn’t it nice when something just works?  We are building Ruby on Rails apps on top of Oracle, so we’re using the Oracle Enhanced ActiveRecord adapter on top of the ruby-oci8 driver library.

The ActiveRecord adapter gives us a nice AR wrapper around our existing Oracle schema, which is great, but what about when I want to work with stored procedures or functions?  Turns out the author of this adapter, Raimonds Simanovskis, has a gem just for this called ruby-plsql.

Include the gem in your Gemfile:

gem 'ruby-plsql'

Then, write an initializer that hooks it to your existing ActiveRecord connection (config/plsql.rb)

plsql.activerecord_class = ActiveRecord::Base

After that, calling procedure is easy.  Oracle return types are automatically cast to ruby types.  Oracle exceptions are raised as OciError, which contains a “code” and “sql” attribute.  However, you can call a “message” method on that exception to get the full error output.

Here I call an Oracle procedure, idcard.nd_is_valid_pin using the plsql object provided in the gem:

ok_pin = plsql.idcard.nd_is_valid_pin( new_pin )
  if ok_pin
    plsql.idcard.update_pin_pr( @info.ndid, params[:old_pin], pin )
  else
    raise Errors::InvalidInput
  end
rescue OCIError => e
 render json: { error: e.message }, status: :unprocessable_entity

That’s it!  Nice and easy, and “rsims” is two for two.

ActiveRecord PSA: nil vs RecordNotFound

I’ve been meaning to get back into blogging here, and I think I have been blocked by the fact that many of the posts in my mental backlog are somewhat large in scope.  So here’s a useful bit of ActiveRecord trivia that I just learned.

When no records are found, the “find” method (ie Person.find(‘badinput’)) throws ActiveRecord::RecordNotFound.

However, any find_by_* method, such as Person.find_by_netid(‘badinput’), will return nil.

This was rather confusing as I focused on the error handling semantics of the Banner API.  I want that exception.  Good news, though:

find_by_netid!(‘badinput’) throws the exception.  The bang changes the behavior, as it often does, though not always in the way you may expect.

TLDR:

2.0.0-p353 :001 > Person.find('badinput')
ActiveRecord::RecordNotFound: Couldn't find Person with ndid=badinput <snip>

2.0.0-p353 :002 > Person.find_by_netid('badinput')
 => nil 

2.0.0-p353 :003 > Person.find_by_netid!('badinput')
ActiveRecord::RecordNotFound: Couldn't find Person with netid = badinput <snip>

So that’s it.  Maybe this will get me back in the habit.  Happy coding!

Recent CITS Tech Session Material

A while back, Scott Kirner handed responsibility for the CITS (nee ES) Tech Sessions to me.  With all the technology changes happening in OIT right now, there are plenty of exciting topics to learn and discuss.  So far in 2014, we have had presentations on the following:

  1. Responsive Web Design
  2. Provisioning a Rails development environment with Vagrant
  3. Git / GitHub basics (thanks Peter Wells!)

Having been justly called out for not providing access to my presentation material, I will now play catch-up and share some slides!  Be aware that these decks only provide partial information; each meeting had a significant live demo component.  They probably need some tweaking and they definitely need context.  For my part, I have planned for weeks to write detailed blog posts on each topic (especially the second one, as I had hardly any time to discuss capistrano).  I seem to be writing a lot today, so maybe I’ll get to them soon.  It’s important to share this information broadly!

For now, try this: the CITS Tech Session resource folder.  Everything’s in there, but let me provide some details.

  1. Responsive Web Design slides
    1. Demo for this was pretty bare-bones.  I put it into GitHub.  Hopefully it makes some sense…
  2. Rails deployment in Vagrant
    1. the most underserved probably.  Lots of good info on vagrant, but not detailed enough on the puppet / capistrano part.
    2. Git repo for the vagrantfile that builds the rails/nginx/unicorn stack (+ oracle client)
    3. Git repo for the main manifest
      1. The modules used by this manifest are all downloaded in the shell provisioner of that vagrantfile, so you can see them there.  They’re all in  NDOIT public repos.
    4. Git repo for the CAS Rails test app — authenticates a user to CAS from the root page, then displays some CAS metadata.
    5. The Vagrantfile used to actually download and deploy that app automatically, but I have removed that step.
    6. This probably deserves three different blogs posts
    7. The puppet modules and CAS test app are extended from code started by Peter Wells!
  3. Rails deployment — not a CITS tech session, but it describes a progression on the work from #2, above.  I demoed a remote deployment to a totally fresh machine with  a “deploy” user and and /apps directory — much like we might do in production.
    1. This presentation was aimed at Ops staff, so I get into the stack a bit more.
    2. I also created an “autodeploy” script to wrap capistrano, to try to show one way in which our current RFC process could accommodate such deployment mechanisms.  I hope for something even more flexible in the future.

No slides from today, but my last two blog posts will provide some information about the GitHub part.  If you want to learn Git, the official site has some great documentation.  Here are Git Basics and Basic Branching and Merging.  Git’s easy branching is one of the most interesting and exciting parts of working with Git, and will be the foundation for multi-developer coding in the future.

As I have mentioned elsewhere, I know not everyone can make each session.  Blog posts will certainly help make the content accessible, but in addition, I am 100% open to doing recap sessions if there are enough people who want it!  Heck, I’ll even sit down with you one-on-one.  So please reach out to me.  The more we can share our combined knowledge, the better developers we’ll be.

Using SSH with GitHub for Fun and Profit

Please see my previous post about joining the NDOIT GitHub Organization.

You can easily clone a git repository using the https URL that appears in your browser when you visit it on GitHub.  However, you can also use an SSH key pair.  It takes a little setup, but you will want to do this for two reasons:

  1. It’s required to use git from the command line after enabling two-factor security
  2. It’s necessary for ssh agent forwarding, which lets you…
    1. use the remote deployment scripts I am developing in capistrano
    2. use ssh with github on vagrant (or any other machine you ssh to) without redoing these steps

So here’s what you want to do:

STEP 1: Follow the instructions on this blog to generate an SSH key  pair and register its public key with your GitHub account.  Note the platform selection tabs at the top of that page, and please be aware that these instructions work for Mac and Linux, but GitHub encourages Windows users to use the Windows native GUI app.

However, I am not recommending anyone proceed with Rails development on Github using Windows.  Many of you have seen the demos I’ve given on developing in Vagrant, and we’ve got Student Team developers building their new app on Linux VMs.  We want to develop as Unix natives!  I am happy to personally assist anyone who needs help making this transition.

STEP 2: Set up two-factor authentication on your GitHub account.  The easiest way to do this is to set up your smartphone with the Google Authenticator app, which will act as a keyfob for getting into GitHub.

STEP 3: Use SSH on the command line.  There are two ways to do this:

  1. Use the SSH URL when you first do your git clone
    1. Find the SSH URL as shown below, circled in green.
    2. do git clone SSH_URL and get on with your life.  You’ll never need the Google Authenticator.
    3. Screen Shot 2014-02-21 at 11.13.55 AM
  2. Modify your existing git checkout directory to use SSH
    1. Check your remotes by typing git remote -v
    2. You’ll see something like this:
      1. origin https://github.com/ndoit/muninn (fetch)
        origin https://github.com/ndoit/muninn (push)
    3. That means you have a remote site called “origin” which represents github.  This is the remote URL you use for push/pull.  We need to change it to use SSH!
    4. That’s easy.  Have the SSH URL handy as shown above.
    5. git remote -h   tells you the help details, but here’s what we’ll do:
      1. git remote set-url origin SSH_URL
      2. Where SSH_URL is your ssh URL, of course.
    6. push/ pull as normal!

SSH Forwarding and Vagrant

Another vital result of enabling SSH is that you can now perform SSH Agent Forwarding.  What do that mean??  Imagine the following scenario:

  1. You create an SSH keypair for use with GitHub as shown above, on your laptop
  2. You launch a vagrant VM for Rails development
  3. You try to git clone via SSH
  4. FORBIDDEN!

The problem is that the SSH key you registered with GitHub is on your laptop, but the VM is a whole other machine.  Fortunately, we can use SSH agent forwarding to use your laptop’s keys on a remote machine.

In Vagrant, this is a one-liner in the Vagrantfile:  config.ssh.forward_agent = true

Or use -A when using ssh from the command line:  ssh user@someplace -A

Now your keys travel with you, and ssh git@github.com will result in a personal greeting, rather than “Permission denied.”

Conclusion

If you’re using GitHub, you need to do all of this.  I can help you.  When you’re done, you’ll be more secure and generally be more attractive to your friends and colleagues.  Plus, you’ll be able to do remote deployments, which is a very good topic for my next blog post. See you next time!

GitHub Organization: NDOIT

In advance of today’s CITS Tech Session on Git and Github, I wanted to make OIT readers aware that we have created a GitHub Organization.  GitHub organizations are like regular GitHub accounts, but you can assign individual GitHub users to it and manage their privileges on repos in the org.  Ours is named NDOIT, an you can find it at https://github.com/ndoit. Many thanks to Chris Frederick for pushing to get this set up, and for Scott Kirner and Todd Hill for finding the funding!  Here are a few important points:

  • How to join this organization
    • If you don’t already have one, create your own github account. For this purpose, my recommendation is to create an account under your nd.edu email address.
    • Provide that account name to Chris or me, and we can add you.
  • How to use the org
    • Look for this drop-down to appear on the left-hand side of your main github landing page after you log in:
    • Screen Shot 2014-02-04 at 10.44.44 AM
    • Change the “account context” to NDOIT, and you’ll see all our shared repos.
  • Public vs private
    • GitHub’s philosophy and pricing model both favor public, open-source repositories.  As such, we have a very limited number of private repos.
    • Because private repositories are scarce, please do not create any without first getting approval.  We have not yet defined a formal process for this, so please talk to me (Brandon Rich).  New Rails apps will get preference in this respect.
  • What sorts of things can be public?
    • Here is another area where I’m afraid the formal process is not nailed down.  Please discuss with me if you think you have a repo that can be public.  As long as there is nothing private or confidential, we can probably make it work.
    • Examples thus far have been puppet repos, rails demo apps, and the BI portal, which went through the Technology Transfer office.
  • What about SVN?
    • SVN is still an appropriate tool for many things:
      • Anything sensitive / non-public that will not go into a private github repo
      • Anything that uses autodeploy

That’s it for this topic.  Please see the follow-up, Using SSH with GitHub for Fun and Profit.

Tunneling Home

ShawshankRedempt_184Pyxurz

So I have an EC2 instance sitting in a subnet in a VPC on Amazon.  Thanks to Puppet, It’s got a rails server, nginx, and an Oracle client.  But it’s got no one to talk to.

It’s time to build a VPN tunnel to campus.  Many, many thanks go to Bob Richman, Bob Winding, Jaime Preciado-Beas, and Vincent Melody for banding together to work out what I’m about to describe.

It turns out the AWS side of this configuration is not actually very difficult. Once traffic reaches us, there’s a lot more configuration to do!  Here’s a quick sketch:

VPN-tunnel
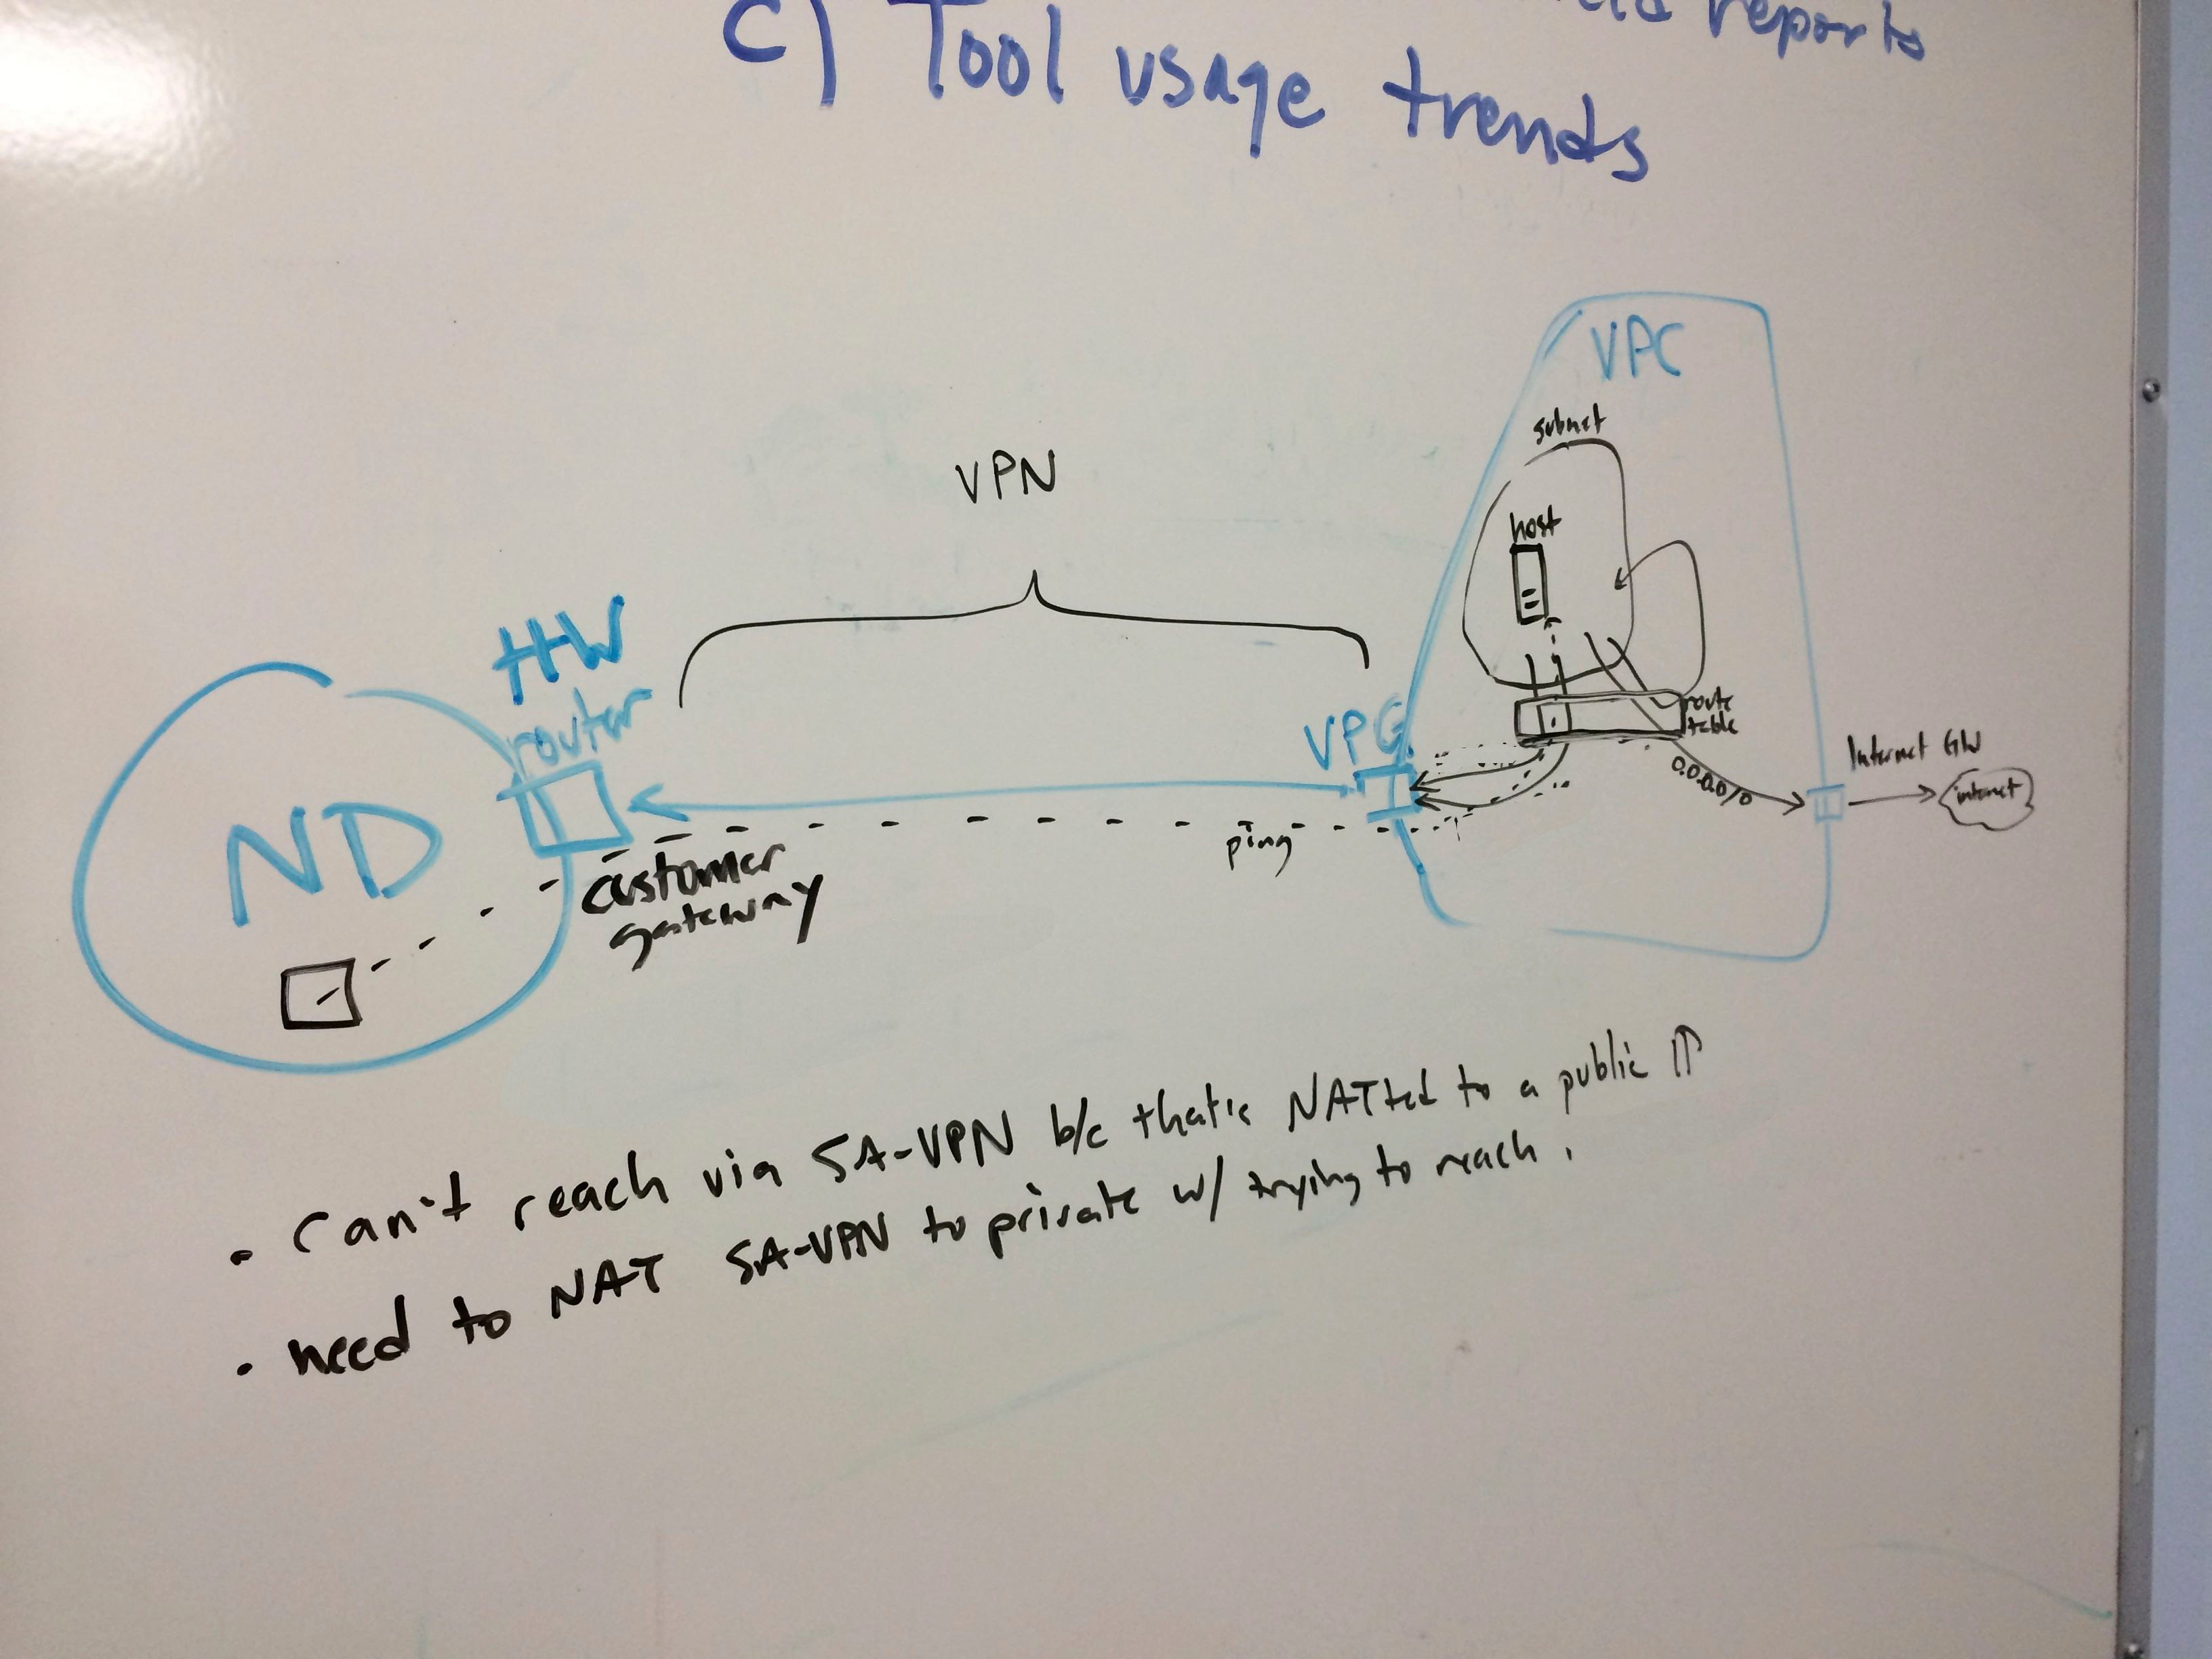
IPs and subnets obscured


You can see the VPC, subnet, and instance on the right.  The rectangle represents the routing table attached to my subnet.  Addresses in the same subnet as the instance get routed back inside the subnet.  Everything else (0.0.0.0/0) goes to the internet gateway and out to the world.

Configuring The Tunnel

To actually communicate with resources inside the Notre Dame firewall, such as our Banner databases, we need a few new resources.  These objects are pretty simple to create in software on AWS:

  1. the virtual private gateway. This is basically a router that sits on the AWS side of the VPN tunnel we’ll create.  You attach it to the VPC, and then you’re done with that object.
  2. the customer gateway.  When you create this object, you give it the public IP of a router on your network.  We’re using one that resides on the third floor of this building.  You need to configure this router to function as the VPN endpoint.  Fortunately, we have people like Bob Richman, who just know how to do that sort of thing.  If we didn’t, AWS provides a “download configuration” button that gives you a config file to apply to the router.  You can specify the manufacturer, type, and firmware level of the router so that it should be plug-and-play.
  3. the VPN connection. This object bridges the two resources named above.

Setting up Routing

Now we want certain traffic to flow over this connection to ND and back again.  Here’s where I start to pretend to know things about networking.

  1. AWS routing table.  We need to set routes on the subnet to which our instance belongs, forwarding traffic intended for Notre Dame resources to the Virtual Private Gateway described above.  No problem.  We define the IP/subnet ranges we want (example: the range for our Banner database service listeners), and route them to the VPG.
  2. VPN Connection static routes.  As I mentioned, this resource bridges the VPG and the Customer gateway on our side.  So it needs the same rules to be configured as static routes.

At this point, we are in business!  Kind of.  I can ping my EC2 instance from campus, but I can’t talk to Oracle from EC2.

Fun Times with DNS

Getting to our development database from anywhere requires a bit of hoop-jumping.  For an end user like me, running a SQL client on my laptop, it typically goes like this:

  1. I use LDAP to connect to an OID (Oracle Internet Directory) server, specifying the service name I want.  My ldap.ora file contains four different domain names: two in front of the firewall and two behind.  It fails over until it can reach one.  So it’s not super-intelligent, but no matter where I call from, one of them should work.
  2. The OID server responds with the domain name of a RAC cluster machine that can respond to my request.
  3. My request proceeds to the RAC cluster, which responds with the domain of a particular RAC node that can service the actual SQL query.

With a little help from Infosec, setting up ND firewall rules, we can connect to LDAP, we can connect to the RAC cluster, and we can even connect to the RAC node.  Via telnet, using IP addresses. Notice the reliance on DNS above?  This got us into a bit of a mess.

Essentially, it was necessary to set up special rules to allow my AWS VPN traffic to use the ND-side DNS servers.  I needed to edit my EC2 instance’s resolv.conf to use them.  We also ran into an issue where the RAC node resolved to a public IP instead of a private one.  This was apparently a bit of a hack during the original RAC setup, and firewall rules have been established to treat it like a private IP.  So again, special rules needed to be established to let me reach that IP over the VPN tunnel.

Success!

After these rules were in place and routes added to the VPN to use them, viola! I am now able to make a Banner query from AWS.  This is a fantastic step forward for app development in the cloud.  It’s only one piece of the puzzle, but an important one, as it is inevitable that we will want to deploy services to AWS that talk to ND resources of one kind or another.

Our networking, infosec, and database guys will probably tell you that some cleanup ought to be done on our side re: network architecture.  There are some “interesting” exceptions in the way we have laid out these particular services and their attendant firewall configuration.  The special rules we created to get this working are not really scalable.  However, these challenges are surmountable, and worth examining as we move forward.

In the meantime, we have made a valuable proof-of-concept for cloud application development, and opened up opportunities for some things I have wanted to do, like measure network latency between AWS and ND.  Perhaps a topic for a future blog post!

Onward!