Feature Image

Recent CITS Tech Session Material

A while back, Scott Kirner handed responsibility for the CITS (nee ES) Tech Sessions to me.  With all the technology changes happening in OIT right now, there are plenty of exciting topics to learn and discuss.  So far in 2014, we have had presentations on the following:

  1. Responsive Web Design
  2. Provisioning a Rails development environment with Vagrant
  3. Git / GitHub basics (thanks Peter Wells!)

Having been justly called out for not providing access to my presentation material, I will now play catch-up and share some slides!  Be aware that these decks only provide partial information; each meeting had a significant live demo component.  They probably need some tweaking and they definitely need context.  For my part, I have planned for weeks to write detailed blog posts on each topic (especially the second one, as I had hardly any time to discuss capistrano).  I seem to be writing a lot today, so maybe I’ll get to them soon.  It’s important to share this information broadly!

For now, try this: the CITS Tech Session resource folder.  Everything’s in there, but let me provide some details.

  1. Responsive Web Design slides
    1. Demo for this was pretty bare-bones.  I put it into GitHub.  Hopefully it makes some sense…
  2. Rails deployment in Vagrant
    1. the most underserved probably.  Lots of good info on vagrant, but not detailed enough on the puppet / capistrano part.
    2. Git repo for the vagrantfile that builds the rails/nginx/unicorn stack (+ oracle client)
    3. Git repo for the main manifest
      1. The modules used by this manifest are all downloaded in the shell provisioner of that vagrantfile, so you can see them there.  They’re all in  NDOIT public repos.
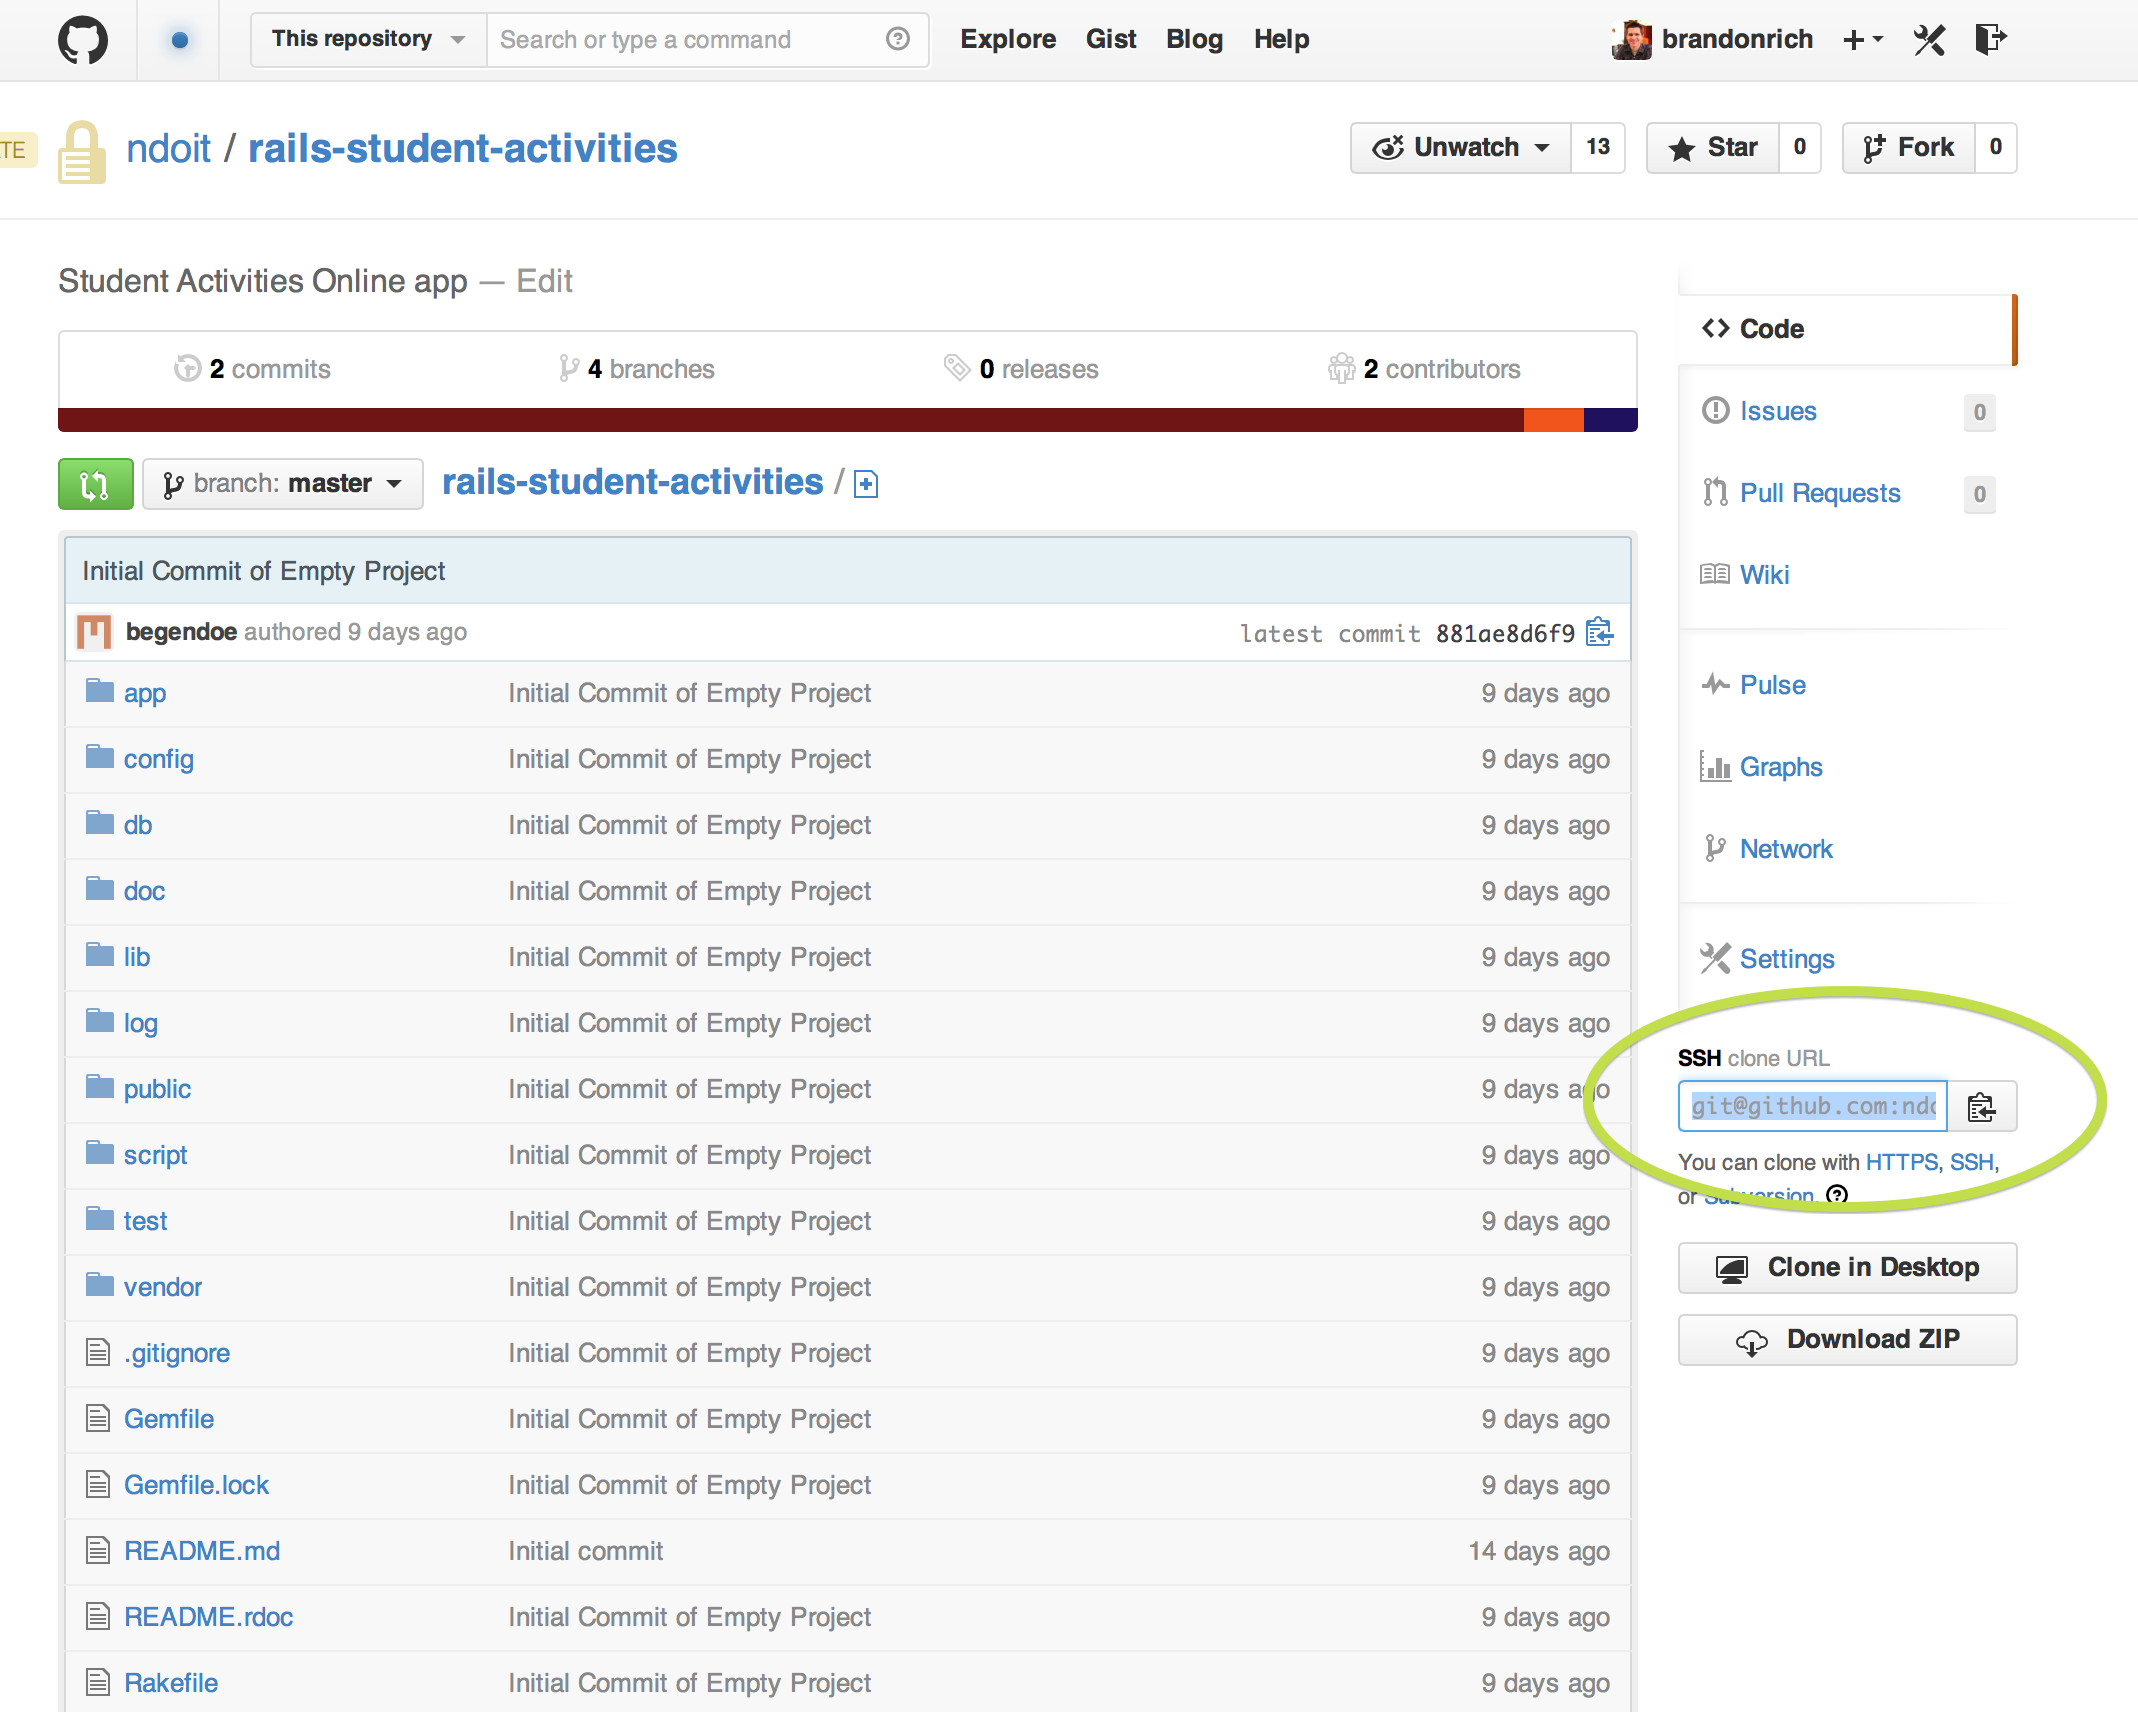
    4. Git repo for the CAS Rails test app — authenticates a user to CAS from the root page, then displays some CAS metadata.
    5. The Vagrantfile used to actually download and deploy that app automatically, but I have removed that step.
    6. This probably deserves three different blogs posts
    7. The puppet modules and CAS test app are extended from code started by Peter Wells!
  3. Rails deployment — not a CITS tech session, but it describes a progression on the work from #2, above.  I demoed a remote deployment to a totally fresh machine with  a “deploy” user and and /apps directory — much like we might do in production.
    1. This presentation was aimed at Ops staff, so I get into the stack a bit more.
    2. I also created an “autodeploy” script to wrap capistrano, to try to show one way in which our current RFC process could accommodate such deployment mechanisms.  I hope for something even more flexible in the future.

No slides from today, but my last two blog posts will provide some information about the GitHub part.  If you want to learn Git, the official site has some great documentation.  Here are Git Basics and Basic Branching and Merging.  Git’s easy branching is one of the most interesting and exciting parts of working with Git, and will be the foundation for multi-developer coding in the future.

As I have mentioned elsewhere, I know not everyone can make each session.  Blog posts will certainly help make the content accessible, but in addition, I am 100% open to doing recap sessions if there are enough people who want it!  Heck, I’ll even sit down with you one-on-one.  So please reach out to me.  The more we can share our combined knowledge, the better developers we’ll be.

Using SSH with GitHub for Fun and Profit

Please see my previous post about joining the NDOIT GitHub Organization.

You can easily clone a git repository using the https URL that appears in your browser when you visit it on GitHub.  However, you can also use an SSH key pair.  It takes a little setup, but you will want to do this for two reasons:

  1. It’s required to use git from the command line after enabling two-factor security
  2. It’s necessary for ssh agent forwarding, which lets you…
    1. use the remote deployment scripts I am developing in capistrano
    2. use ssh with github on vagrant (or any other machine you ssh to) without redoing these steps

So here’s what you want to do:

STEP 1: Follow the instructions on this blog to generate an SSH key  pair and register its public key with your GitHub account.  Note the platform selection tabs at the top of that page, and please be aware that these instructions work for Mac and Linux, but GitHub encourages Windows users to use the Windows native GUI app.

However, I am not recommending anyone proceed with Rails development on Github using Windows.  Many of you have seen the demos I’ve given on developing in Vagrant, and we’ve got Student Team developers building their new app on Linux VMs.  We want to develop as Unix natives!  I am happy to personally assist anyone who needs help making this transition.

STEP 2: Set up two-factor authentication on your GitHub account.  The easiest way to do this is to set up your smartphone with the Google Authenticator app, which will act as a keyfob for getting into GitHub.

STEP 3: Use SSH on the command line.  There are two ways to do this:

  1. Use the SSH URL when you first do your git clone
    1. Find the SSH URL as shown below, circled in green.
    2. do git clone SSH_URL and get on with your life.  You’ll never need the Google Authenticator.
    3. Screen Shot 2014-02-21 at 11.13.55 AM
  2. Modify your existing git checkout directory to use SSH
    1. Check your remotes by typing git remote -v
    2. You’ll see something like this:
      1. origin https://github.com/ndoit/muninn (fetch)
        origin https://github.com/ndoit/muninn (push)
    3. That means you have a remote site called “origin” which represents github.  This is the remote URL you use for push/pull.  We need to change it to use SSH!
    4. That’s easy.  Have the SSH URL handy as shown above.
    5. git remote -h   tells you the help details, but here’s what we’ll do:
      1. git remote set-url origin SSH_URL
      2. Where SSH_URL is your ssh URL, of course.
    6. push/ pull as normal!

SSH Forwarding and Vagrant

Another vital result of enabling SSH is that you can now perform SSH Agent Forwarding.  What do that mean??  Imagine the following scenario:

  1. You create an SSH keypair for use with GitHub as shown above, on your laptop
  2. You launch a vagrant VM for Rails development
  3. You try to git clone via SSH
  4. FORBIDDEN!

The problem is that the SSH key you registered with GitHub is on your laptop, but the VM is a whole other machine.  Fortunately, we can use SSH agent forwarding to use your laptop’s keys on a remote machine.

In Vagrant, this is a one-liner in the Vagrantfile:  config.ssh.forward_agent = true

Or use -A when using ssh from the command line:  ssh user@someplace -A

Now your keys travel with you, and ssh git@github.com will result in a personal greeting, rather than “Permission denied.”

Conclusion

If you’re using GitHub, you need to do all of this.  I can help you.  When you’re done, you’ll be more secure and generally be more attractive to your friends and colleagues.  Plus, you’ll be able to do remote deployments, which is a very good topic for my next blog post. See you next time!

GitHub Organization: NDOIT

In advance of today’s CITS Tech Session on Git and Github, I wanted to make OIT readers aware that we have created a GitHub Organization.  GitHub organizations are like regular GitHub accounts, but you can assign individual GitHub users to it and manage their privileges on repos in the org.  Ours is named NDOIT, an you can find it at https://github.com/ndoit. Many thanks to Chris Frederick for pushing to get this set up, and for Scott Kirner and Todd Hill for finding the funding!  Here are a few important points:

  • How to join this organization
    • If you don’t already have one, create your own github account. For this purpose, my recommendation is to create an account under your nd.edu email address.
    • Provide that account name to Chris or me, and we can add you.
  • How to use the org
    • Look for this drop-down to appear on the left-hand side of your main github landing page after you log in:
    • Screen Shot 2014-02-04 at 10.44.44 AM
    • Change the “account context” to NDOIT, and you’ll see all our shared repos.
  • Public vs private
    • GitHub’s philosophy and pricing model both favor public, open-source repositories.  As such, we have a very limited number of private repos.
    • Because private repositories are scarce, please do not create any without first getting approval.  We have not yet defined a formal process for this, so please talk to me (Brandon Rich).  New Rails apps will get preference in this respect.
  • What sorts of things can be public?
    • Here is another area where I’m afraid the formal process is not nailed down.  Please discuss with me if you think you have a repo that can be public.  As long as there is nothing private or confidential, we can probably make it work.
    • Examples thus far have been puppet repos, rails demo apps, and the BI portal, which went through the Technology Transfer office.
  • What about SVN?
    • SVN is still an appropriate tool for many things:
      • Anything sensitive / non-public that will not go into a private github repo
      • Anything that uses autodeploy

That’s it for this topic.  Please see the follow-up, Using SSH with GitHub for Fun and Profit.

10 Things a Modern IT Professional Should Do

OM3.29.11 MCOB Study

You work in IT. You’re in higher education. It’s 2014. Get a move on!

1. Back up your files.

When your machine crashes, you’ll get no sympathy. The whole world knows you should back up your computer. There’s no excuse. Go get CrashPlan or some other way to make sure your stuff isn’t lost. No, don’t go on to number two until you’ve finished this. It’s that important.

2. Use a password manager.

Most people only use a couple of passwords frequently enough to remember them. Go get PasswordSafe (pwSafe on the Mac) and start generating random passwords for your accounts. Don’t bother remembering them, just store ’em in your password manager and copy/paste when you need them. Secure this password manager with one hard password (the only one you have to remember).

3. Use a collaboration tool to share files rather than emailing them.

Email attachments fill up your mailbox and affect performance. Now think about how that might affect your recipients. Just use a tool like Box and send a share link. Much easier and you can control it later if you need to.

4. Learn some basic scripting, even if it’s just an Excel formula.

You don’t need to be a programmer to do some basic string manipulation or some basic conditionals (if-then). Excel or Google Spreadsheets are incredibly powerful tools in their own right.

5. Find a reliable IT news source relevant to your area (news site, mailing list, blog, twitter).

Make it part of your daily habit to check your RSS (try feedly.com) or Twitter feeds. Seek out and follow a couple of good news sites, tech journalists, or smart people who keep tabs on IT stuff. Let these people be your filter and don’t be in the dark about what’s going on in your industry.

6. Build relationships with people who can help you improve, especially from other departments or organizations.

We learn from each other – by listening, by teaching, or by doing. Join campus communities (e.g., Developer Meetups or Mobile Community of Practice), higher ed user groups, Educause constituent groups, industry consortiums, etc. If it doesn’t exist, create one.

7. Contribute back to the community – an open source project, present at a conference, write a blog post, etc.

You’re standing on the shoulders of giants, and with luck your successors may just stand on yours. We benefit from so many other generous contributions and we’re fortunate to work in higher education, where our counterparts are willing to swap stories and strategies. Be a part of the larger community.

8. Listen to your customers.

Work is happier when your customers are happier. What can you do that will make their lives better? How do you know without talking to them? Get out there and watch them use your software, have them brainstorm ideas, or just listen to them complain. Just knowing that they’re being heard will make your customers happier.

9. Figure out your smartphone.

There’s nothing sillier than an IT person who is computer illiterate, and that counts for your smartphone as well. It’s a magical supercomputer in your pocket. It probably cost you a bunch of money and it does way more than phone, email, and Angry Birds. You can tie in with your VoIP phone, access files via Box, edit Google Docs, submit expense reports, and other wizardry.

10. Break stuff.

Our world is full of settings screens, drop-down menus, config files, old hardware, and cheap hosting. Sadly, too many people are afraid of what might go wrong and they never discover the latest features, time-saving methods, or opportunities to innovate. Try out the nightly build (in dev, maybe). Ask vendors about loaning you some demo hardware. Challenge yourself on whether there’s another way to get it done. You’re in IT. Don’t be afraid to break something – it can be fixed. And who knows? You might just learn a thing or two.

Our Finest Hour

Winston-Churchill4

Last Friday (1/24/2014) saw our campus experience multiple service disruptions.  Both were service provider issues – one with Box, the other with Google.  In both cases, the services were resolved in a timely manner.  Both the Box and Google status pages were kept up to date.

What was required from OIT to resolve these interruptions?  Communication and vendor management.  We did not have to burn hours and hours of people time digging in to determine the root cause of these issues.  We did not have to bring in pizza and soda, flip charts and markers, bagels and coffee, and more pizza and more soda to fuel ourselves to deal with this issue.  We did not work late and long into the night, identifying and resolving the root cause.

Why?  Because we have vendors we trust, employing more engineers than we have humans in all of OIT, singularly focused on their product.

I was part of the team that worked through our Exchange issues last fall.  I will be the first to tell you that the week we spent getting to operational stability was a phenomenal team effort.  We had an engineer from Microsoft and all of the considerable talent OIT could bring to bear to solve our issues.  And solve them we did.  Yes, we worked late into the night.  Yes, we fueled ourselves with grease and caffeine.  Yes, we used giant post-its and all the typical crisis management tools.

Everyone on the team did not get much sleep, did not spend the typical evenings with their families, and displayed their remarkable devotion to their profession and to our University.  Everyone on the team was elated when we solved a gnarly set of technical issues and got to operational stability.  And everyone on the team did not relive that experience this past Friday.  They were able to focus on their core mission.

We have moved all the way up the stack of abstraction in the space offered by both Box and Google.  It is something to celebrate, as it allows us to relentlessly focus on delivering value to the students, faculty, and staff at our Lady’s University.


Google Apps Scripts, LDAP, and Wookiee Steak

I’ve been a Google Apps user for as long as I could score an invite code to Gmail. Then came Google Calendar, Google Docs and Spreadsheets, and a whole slew of other stuff. But as I moved from coder to whatever-I-am-now, I stopped following along with the new stuff Google and others kept putting out there. I mean, I’m vaguely aware of Google Apps Engine and something called Google Apps Script, but I hadn’t spent any real time looking at them.

But as any good IT professional should, I’m not afraid to do a little scripting here any there to accomplish a task. It’s fairly common to get a CSV export that needs a little massaging or find a perfect API to mash up with some other data.

The other day, I found myself working with some data in a Google Spreadsheet and thinking about one of my most common scripting tasks – appending data to existing data. For instance, I start with something like a list of users and want to know whether they are faculty, staff, or student.

netid name Affiliation
cgrundy1 Chas Grundy ???
katie Katie Rose ???

Aside: Could I get this easily by searching EDS? Sure. Unfortunately, my data set might be thousands of records long and while I could certainly ask our friends in identity management to get me the bulk data I want, they’re busy and I might need it right away. Or at least, I’m impatient and don’t want to wait. Oh, and I need something like this probably once or twice a week so I’d just get on their nerves. Moving on…

So that’s when I began to explore Google Apps Script. It’s a Javascript-based environment to interact with various Google Apps, perform custom operations, or access external APIs. This last part is what got my attention.

First, let’s think about how we might use a feature like this. Imagine the following function:

=getLDAPAttribute("cgrundy1","ndPrimaryAffiliation")

If I passed it the NetID and attribute I wanted, perhaps this function would be so kind as to go fetch it for me. Sounds cool to me.

Now the data I want to append lives in LDAP, but Javascript (and GA Script) can’t talk to LDAP directly. But Google Apps Script can interpret JSON (as well as SOAP or XML), so I needed a little LDAP web service. Let’s begin shaving the yak. Or we could shave a wookiee.

Google Apps Script and LDAP API flowchart

First, I cobbled together a quick PHP microapp and threw it into my Notre Dame web space. All it does is take two parameters, q and attribute, query LDAP, and return the requested attribute in JSON format.

Here’s an example:

index.php?q=cgrundy1&attribute=ndPrimaryAffiliation

And this returns:

{
"title": "LDAP",
"attributes": {
"netid": "cgrundy1",
"ndprimaryaffiliation": "Staff"
}
}

View the full PHP script here

For a little extra convenience, the script allows q to be a NetID or email address. Inputs are sanitized to avoid LDAP injections, but there’s no throttling at the script level so for now it’s up to the LDAP server to enforce any protections against abuse.

Next, the Google Apps Script needs to actually make the request. Let’s create the custom function. In Spreadsheets, this is found under Tools > Script Editor.


function getLDAPAttribute(search,attribute) {
search = search.toLowerCase();
attribute = attribute.toLowerCase();
var attr_value = "";
var url = 'https://www3.nd.edu/~cgrundy1/gapps-ldap-test/?'
+ 'q=' + search
+ '&attribute=' + attribute;
var response = UrlFetchApp.fetch(url);
var json = response.getContentText();
var data = JSON.parse(json);
attr_value = data.attributes[attribute];
return attr_value;
};

This accepts our parameters, passes them along to the PHP web service in a GET request, parses the response as JSON, and returns the attribute value.

Nota bene: Google enforces quotas on various operations including URL Fetch. The PHP script and the Google Apps Script function could be optimized, cache results, etc. I didn’t do those things. You are welcome to.

Anyway, let’s put it all together and see how it works:

Screenshot of custom formula in action

Well, there you have it. A quick little PHP microapp, a simple custom Javascript function, and now a bunch of cool things I can imagine doing with Google Apps. And just in case you only clicked through to this article because of the title:

<joke>I tried the Wookiee Steak, but it was a little chewy.</joke>

Tunneling Home

ShawshankRedempt_184Pyxurz

So I have an EC2 instance sitting in a subnet in a VPC on Amazon.  Thanks to Puppet, It’s got a rails server, nginx, and an Oracle client.  But it’s got no one to talk to.

It’s time to build a VPN tunnel to campus.  Many, many thanks go to Bob Richman, Bob Winding, Jaime Preciado-Beas, and Vincent Melody for banding together to work out what I’m about to describe.

It turns out the AWS side of this configuration is not actually very difficult. Once traffic reaches us, there’s a lot more configuration to do!  Here’s a quick sketch:

VPN-tunnelIPs and subnets obscured


You can see the VPC, subnet, and instance on the right.  The rectangle represents the routing table attached to my subnet.  Addresses in the same subnet as the instance get routed back inside the subnet.  Everything else (0.0.0.0/0) goes to the internet gateway and out to the world.

Configuring The Tunnel

To actually communicate with resources inside the Notre Dame firewall, such as our Banner databases, we need a few new resources.  These objects are pretty simple to create in software on AWS:

  1. the virtual private gateway. This is basically a router that sits on the AWS side of the VPN tunnel we’ll create.  You attach it to the VPC, and then you’re done with that object.
  2. the customer gateway.  When you create this object, you give it the public IP of a router on your network.  We’re using one that resides on the third floor of this building.  You need to configure this router to function as the VPN endpoint.  Fortunately, we have people like Bob Richman, who just know how to do that sort of thing.  If we didn’t, AWS provides a “download configuration” button that gives you a config file to apply to the router.  You can specify the manufacturer, type, and firmware level of the router so that it should be plug-and-play.
  3. the VPN connection. This object bridges the two resources named above.

Setting up Routing

Now we want certain traffic to flow over this connection to ND and back again.  Here’s where I start to pretend to know things about networking.

  1. AWS routing table.  We need to set routes on the subnet to which our instance belongs, forwarding traffic intended for Notre Dame resources to the Virtual Private Gateway described above.  No problem.  We define the IP/subnet ranges we want (example: the range for our Banner database service listeners), and route them to the VPG.
  2. VPN Connection static routes.  As I mentioned, this resource bridges the VPG and the Customer gateway on our side.  So it needs the same rules to be configured as static routes.

At this point, we are in business!  Kind of.  I can ping my EC2 instance from campus, but I can’t talk to Oracle from EC2.

Fun Times with DNS

Getting to our development database from anywhere requires a bit of hoop-jumping.  For an end user like me, running a SQL client on my laptop, it typically goes like this:

  1. I use LDAP to connect to an OID (Oracle Internet Directory) server, specifying the service name I want.  My ldap.ora file contains four different domain names: two in front of the firewall and two behind.  It fails over until it can reach one.  So it’s not super-intelligent, but no matter where I call from, one of them should work.
  2. The OID server responds with the domain name of a RAC cluster machine that can respond to my request.
  3. My request proceeds to the RAC cluster, which responds with the domain of a particular RAC node that can service the actual SQL query.

With a little help from Infosec, setting up ND firewall rules, we can connect to LDAP, we can connect to the RAC cluster, and we can even connect to the RAC node.  Via telnet, using IP addresses. Notice the reliance on DNS above?  This got us into a bit of a mess.

Essentially, it was necessary to set up special rules to allow my AWS VPN traffic to use the ND-side DNS servers.  I needed to edit my EC2 instance’s resolv.conf to use them.  We also ran into an issue where the RAC node resolved to a public IP instead of a private one.  This was apparently a bit of a hack during the original RAC setup, and firewall rules have been established to treat it like a private IP.  So again, special rules needed to be established to let me reach that IP over the VPN tunnel.

Success!

After these rules were in place and routes added to the VPN to use them, viola! I am now able to make a Banner query from AWS.  This is a fantastic step forward for app development in the cloud.  It’s only one piece of the puzzle, but an important one, as it is inevitable that we will want to deploy services to AWS that talk to ND resources of one kind or another.

Our networking, infosec, and database guys will probably tell you that some cleanup ought to be done on our side re: network architecture.  There are some “interesting” exceptions in the way we have laid out these particular services and their attendant firewall configuration.  The special rules we created to get this working are not really scalable.  However, these challenges are surmountable, and worth examining as we move forward.

In the meantime, we have made a valuable proof-of-concept for cloud application development, and opened up opportunities for some things I have wanted to do, like measure network latency between AWS and ND.  Perhaps a topic for a future blog post!

Onward!

A pause for reflection

CIMG7307

With the holiday season upon us, we are blessed to work at an institution that shuts down for the better part of two weeks, creating a culture of rejuvenation.  For our part, we will be using this time to passively reflect upon what we have learned this fall, and the amazing things we will accomplish in 2014.

Wishing everyone a happy, healthy, and restful break.

Phenomenally exciting things coming in 2014!

4 Projects

Matt in Milan

In order to focus our energy on understanding the toolset that Amazon Web Services presents, we are focusing on four specific initiatives in the first quarter of 2014.  These include:

  • AAA High Availability for Cloud Services, which will remove the campus dependency for off-campus users accessing SaaS services, including Box, Google, Innotas, Concur among others.
  • Backups, which will allow us to explore the feasibility of using a combination of S3 and Glacier for backups.
  • ModoLabs, which will host the campus mobile application and is not tightly coupled to existing campus services.
  • Conductor, which entails moving from an existing hosting provider to Amazon Web Services.  For perspective, Conductor hosts more than 360 of the University’s websites, including oit.nd.edu.  For monthly statistics about Conductor’s usage, refer to the nd.edu blog.

Each of these four projects will deliver value to Notre Dame and the students, faculty, and staff whom we serve.  These projects will also serve as the vehicle through which our operational cloud model, leveraging Amazon Web Services, gets defined.

In a governance working session this afternoon, we made progress on defining the standards for tagging machine instances.  As we approach the holiday break, we look forward to resting, reflecting, and returning, energized to make tremendous strides in 2014.

Onward!

The Phoenix Project

I just finished reading The Phoenix Project (by Gene Kim, Kevin Behr and George Spafford, Jan 10, 2013).  I found it to be a pretty cool way of conveying organizational development concepts for an IT organization.  The year long efforts to turn around a failing IT department for a large company (Parts Unlimited) was presented as a novel.

I was sure, as I neared the end, that there would be a chapter (or appendix) at the end where the authors would share a clear list of the concepts/theories presented within the book.  Specifically the Three Ways.  I was surprised to find no such item.  So I thought I’d find a reference to a website, or another book, or something that would tell me how to implement the specifics…or at least explain them.  Again no such thing.

It remained a compelling novel.  I actually got to like the characters.  I cheered for the protagonist and booed the antagonist.  My only (negative) criticisms are that the characters could have been developed a little more – I accepted the less than thorough development because I thought it wasn’t going to be a “novel.”  Also the demise of the antagonist was anti-climatic.  But I was happy with the book overall and it definitely got me thinking.

There were some basic steps any department or unit could take to improve.  One of these was making improving internal processes a top priority!  I’ve seen this in action and totally agree…especially automation.  Here are some points:

There are 4 types (categories) of work

  • Business projects
  • Internal projects
  • Changes
  • Unplanned work

Workcenters are made up of:

  • Machine
  • Methods
  • Man
  • Measures

And I found a nice set of quotes to tweet!  Like, “learning to say ‘no’ is just the tip of the iceberg.”

There’s a lot to learn, and even more to try.  What did you think of the book?