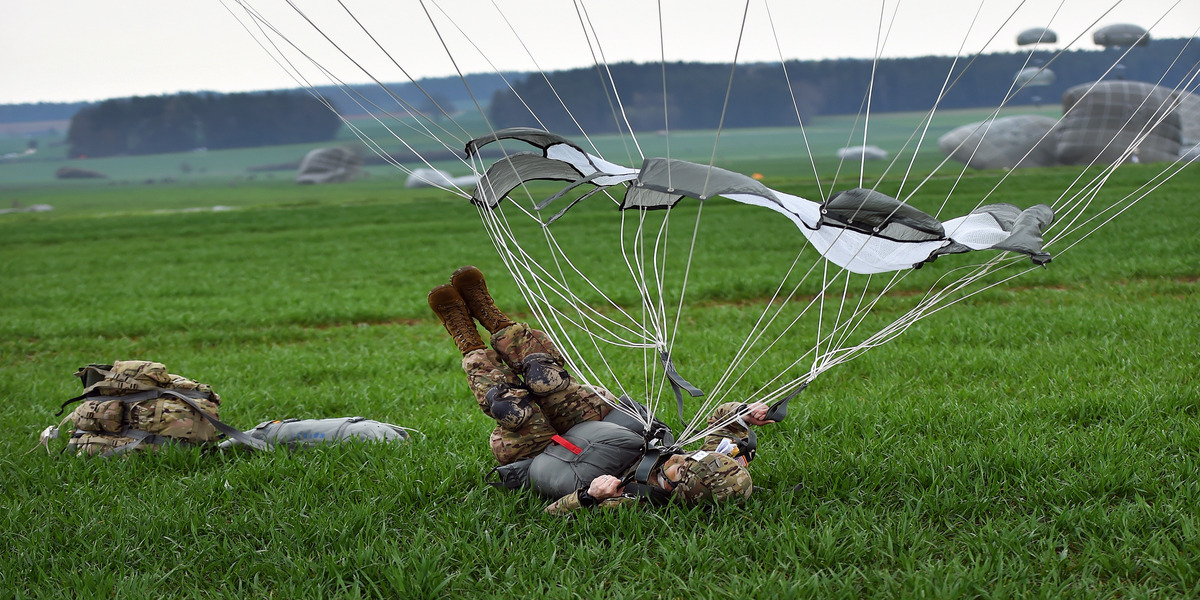
Airborne operations have been a tactically advantageous method of entering a battlefield for decades. However, falling and more importantly, landing require a very technical and precise skill set to execute correctly without providing harm to the soldier’s body. The rapid deceleration that results when a paratrooper lands places a lot of force in a short amount of time on their joints. The rate of injury in airborne jumps is about 5 out of every 1000. An understanding of what is going on when a paratrooper lands— both correctly and incorrectly— can be beneficial to helping reduce injury to the soldier, and preserve the longevity of the soldier’s body.
Continue reading “It’s Not About How Well You Fall, but How Well You Land – The Biomechanics of a Military Parachute Landing”Tag: joints
Taking Collagen and Copper Supplements can decrease the risk of bone fractures

When we think of building strong bones, most of us picture drinking plenty of milk for its calcium—at least, that’s what our elementary gym teachers used to tell us. But building and maintaining strong bones requires more than just calcium from milk; supplemental vitamins play a key role in the development and maintenance of strong bones. Bone fractures are common in young, but especially elderly people, and adding collagen supplements to one’s diet can have a major impact on bone toughness reducing the risk of fractures.
Continue reading “Taking Collagen and Copper Supplements can decrease the risk of bone fractures”From Strain to Pain: Role of Altered Loadings at Joints as Onset for Osteoarthritis (OA)
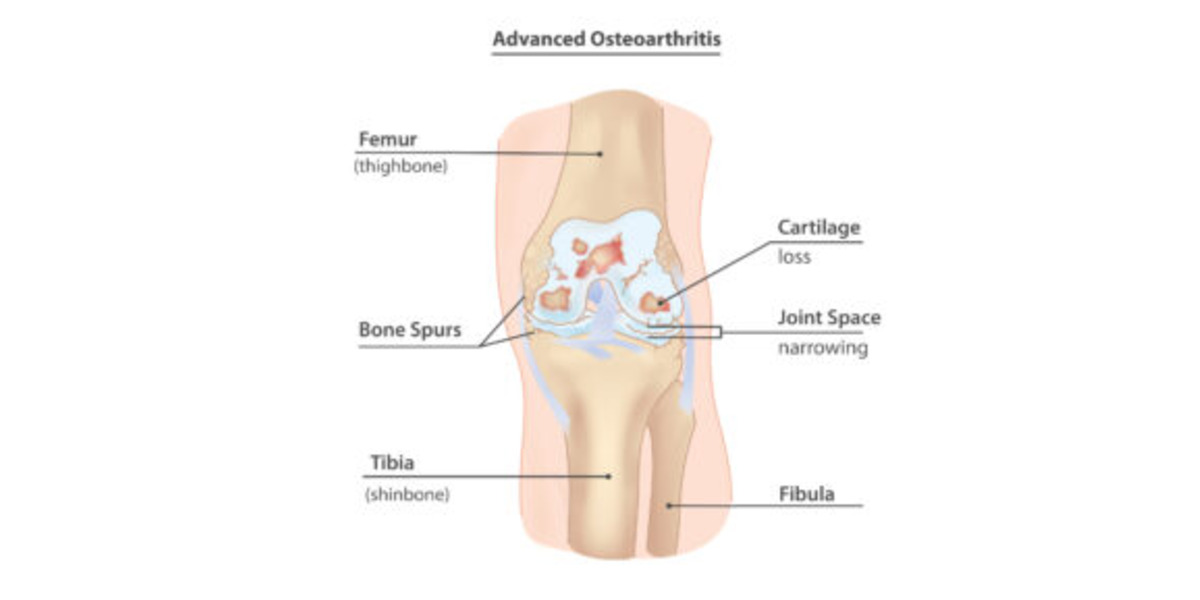
Featured image courtesy of InjuryMap.
Joint degenerative diseases, such as Osteoarthritis, are an increasing cause of pain and disability in millions of people worldwide, per Sanchez-Adams et. al. As a culture of intense, nonstop work is promoted, people incline to not give their bodies enough time to rest, which has increased the cases of joint injuries, especially those to the lower body; specifically in those populations that are exposed to high intensity physical activity. This is concerning, since it has been discovered that joint injuries provoke an alteration in how these joints distribute loads, drifting from their physiological, or typical/natural, behavior, as demonstrated by Ko et. al. Consequently, this affects the biological response of the bone and cartilage that compose that affected joint, leading to potential degeneration due to the altered mechanotransduction (interpretation of mechanical signals to biochemical ones) interactions of the cell and cartilage forming cells, osteocytes and chondrocytes. This degeneration is what characterizes the concerning and debilitating Osteoarthritis (OA). This leads us to our questions: Why does the altered loading affect my joints? If I suffer an injury, can I prevent the degeneration of my joints and live a long, healthy life?
Continue ReadingYour ankle could replace your knee! – How Rotationplasty gives ankles new function.
Typically, the joys of childhood that adults reminisce about include carefree playing, running, and jumping—not cancer. Despite this, childhood cancer affects nearly 10,000 children in the U.S. every year, and of these cases, about 500 (2 percent) involve osteosarcoma. Rotationplasty is a surgery that can give childhood osteosarcoma survivors requiring amputation the best chance of running and jumping again, just like before.
Read more: Your ankle could replace your knee! – How Rotationplasty gives ankles new function. Continue reading “Your ankle could replace your knee! – How Rotationplasty gives ankles new function.”Can Smartphone Overuse Permanently Damage Thumb Function?

Recently, a few studies(Inal et al. and Osailan) have been conducted on young people and adults regarding their pinch grip and hand grip strength. Shockingly those studies show that people who spend a long time using smartphones show very poor performance in their pinch and hand grip. We know our thumb is the finger used mostly for operating smartphones. It is also the most significant finger for any grip as well. Is it possible that the thumb is damaged permanently by overuse of a smartphone or is it just a correlation, not a causation?
Continue reading “Can Smartphone Overuse Permanently Damage Thumb Function?”Wreckage Before the Real Crash: The Biomechanics of Crash Test Dummies

Every 25 seconds, someone is killed in a car accident, resulting in more than 1.25 million deaths worldwide each year.
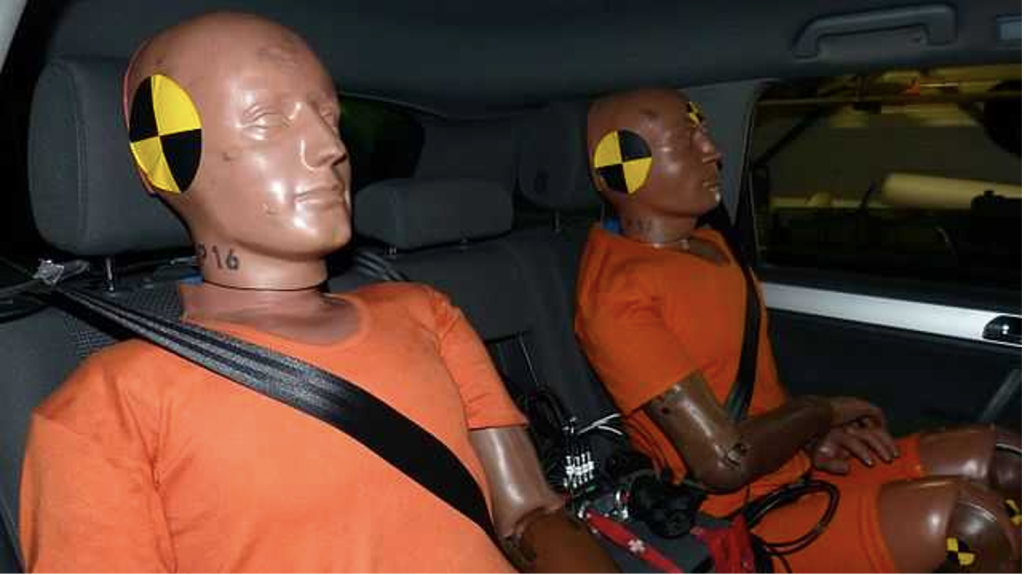
As a result, dummies are an important tool used in many safety tests for car crashes, and they help to inform many design decisions for automobile manufacturers. Since these dummies are used to assess human behavior in many types of situations involving collisions, swerving, and other performance measures, the primary goal for dummy creators is to imitate human response as closely as possible using artificial means.
Read more: Wreckage Before the Real Crash: The Biomechanics of Crash Test DummiesTherefore, biomechanics plays an integral role in dummy design, from choosing materials that accurately reflect limb stiffness, to assembling ball-and-socket joints that sever when undergoing a certain threshold stress or strain. There are many techniques that researchers use – from computational models to in-field testing – to ensure these dummies reflect the parameters and properly inform the design decisions they are a part of.
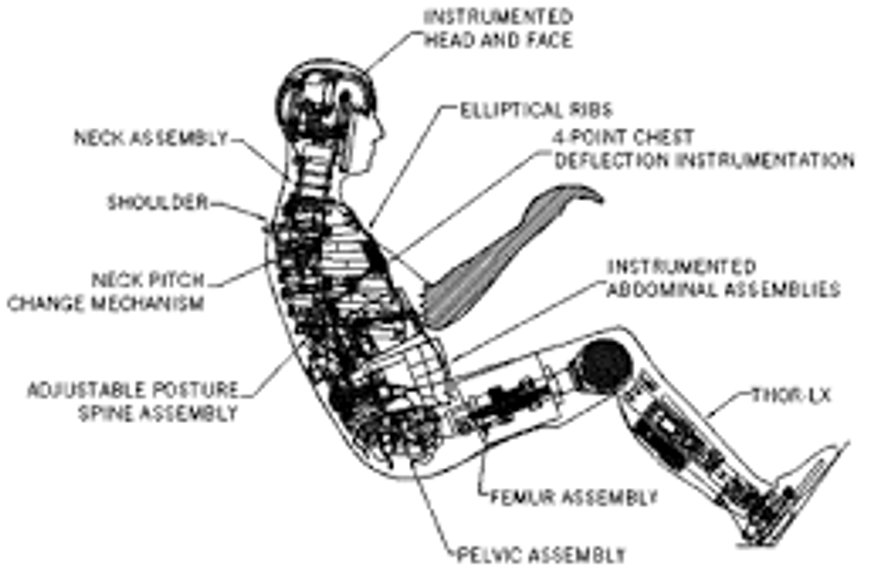
Manufacturers routinely spend millions of dollars each year to develop and fine-tune the dummies (or more technically known as anthropomorphic test devices or ATDs) that they implement in their testing procedures. Its history can be traced all the way back to 1949, where the US Air force implemented a dummy for test ejection seats, while they were first implemented commercially by General Motors more than 30 years later. They have undergone many advancements in terms of their accuracy and manufacturing efficiency, arriving at the now ubiquitous Hybrid-III model, which resembles a 50th percentile adult “family man” male that is used in almost all testing simulations. Although many cadever models have been explored, these artificial models offer the most consistent and reliable solution to testing needs, which involves blunt head-on crashes, various types of rollovers, and other rear-based and side-based collisions. By equipping dummies with different kinds of sensors, primarily consisting of MEMs accelerometers and other force transducers, dummies provide predictive power on the impact of different simulation parameters on driver safety and other outcomes.
Dummy performance analysis can be found both in creation of the dummies, ensuring the dummies have the correct human mechanical properties, and in dummy testing, anticipating damages in crashes. Both see a heavy cross-section in biology and mechanics, best illustrated by the head-drop test in the initial development stage. Here, a dummy head undergoes a drop from a predetermined height, and sensing systems ensure the model has optimal weight and damping properties in comparison to in vivo concussion testing. This way, when the commonly used QMA Series 3 DoF Force Transducer later measures neck whiplash force (the most common cause of car crash injury), testing models can be confident such data will reflect real-world collisions. These kinds of before and after tests are used in all parts of the dummy, from parts as large as the lower back, to parts as small as the hinge joint in a finger knuckle. Such precision is needed in all areas to increase the predictive power of dummies, since details like Young’s Modulus (a measure of stiffness) in the chest area affects steering wheel impact displacement, while the coating paint consistency affects the skin abrasions associated with friction and rubbing. Each part of the dummy is crafted meticulously, and as such, the manufacturing and design process of the dummies involves a fast knowledge of physics, biology, and everything in between. Some additional overviews and readings can be found here and here.
Knee Pain from Golf? Look No Further.
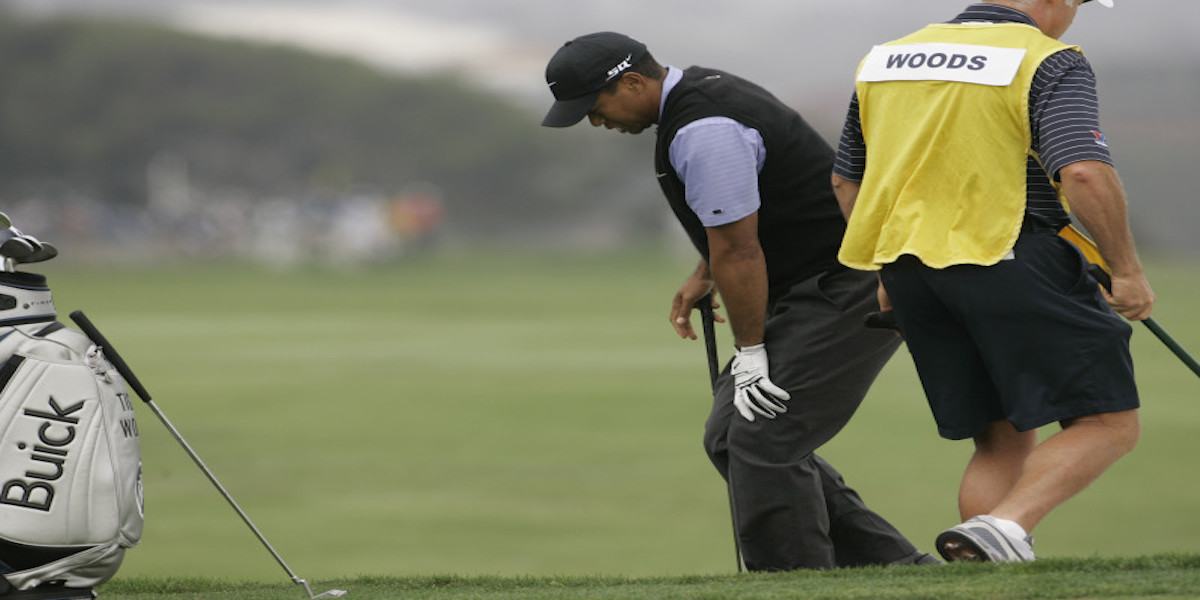
If you like golf, you probably remember watching Tiger Woods win the 2008 U.S. Open with a torn anterior cruciate ligament (ACL). This may have seemed like a rare injury for a golfer, as most golf-related injuries involve the lower back, but knee injuries due to the golf swing are more common than you may think. In fact, the prevalence of knee injuries in golf is roughly 18%, with an even higher percentage when you only consider the elderly. Since most of these injuries are a result of overuse, it is important for golfers to understand why these injuries occur if they want to keep playing for years to come.
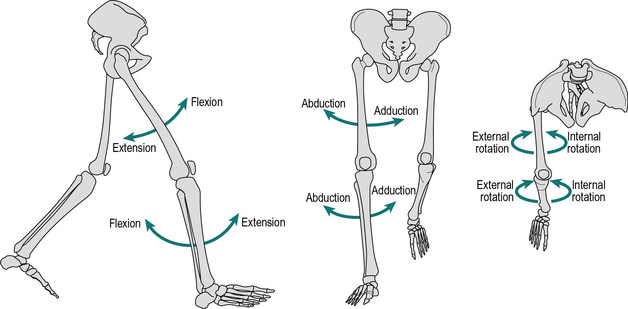
Read More: Knee Pain from Golf? Look No Further.Unlike traumatic injuries in high-intensity sports like football or basketball, most golf-related injuries are the result of overuse. As for the knee joint, there are multiple mechanical factors in the golf swing that contribute to overuse injuries. During the downswing, the lead knee rotates rapidly from a state of adduction (external rotation) to a state of abduction (internal rotation). This creates an abduction moment on the lead knee, which can cause ACL tears. The graph shows a plot of adduction/abduction moments on the knees during a golf swing, which was measured using force plates and retroreflective markers on golfers’ legs.
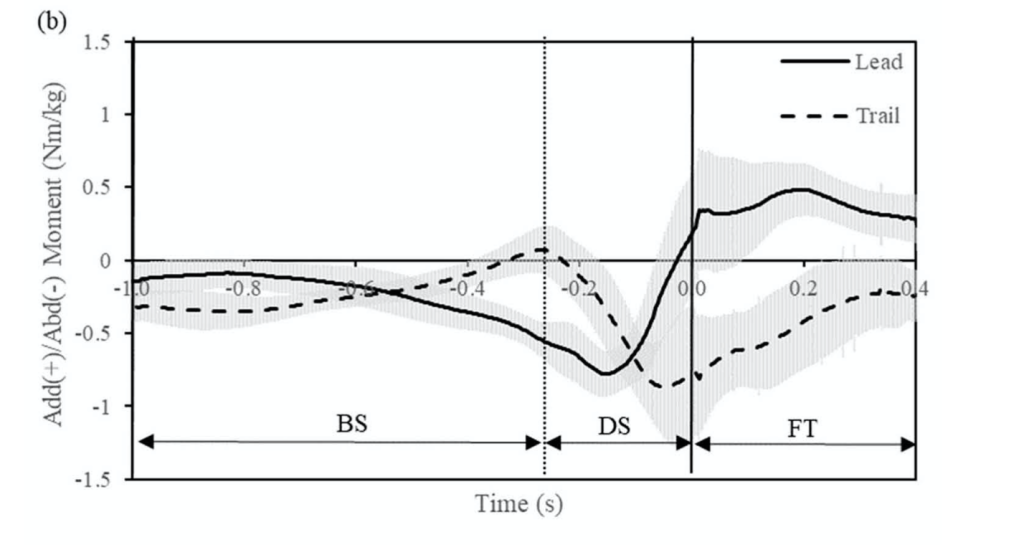
The magnitude (roughly 1 Nm/kg) is not large enough to cause traumatic stress on the ACL but is enough to potentially cause an injury over many repetitions of the golf swing. In addition to rapid rotation, the lead leg undergoes rapid extension during the downswing. The combination of these movements in large volumes over time can lead to other ligament tears or osteoarthritis. Osteoarthritis occurs when tissues in the joint break down over time.
In addition to these biomechanical movements, other factors like pre-existing knee conditions play a significant role in golf-related injuries. Over 30% of golfers with previous knee pain feel that golf has made their symptoms worse. The same is true for golfers with a previous total-knee arthroscopy (TKA), as nearly 34.9% experience pain after playing. Considering that golf is very popular among the older population, it is important to understand how to limit the risk of injury in the golf swing.
While the golf swing can lead to overuse injuries, there are a few preventative methods golfers can implement to protect their knees. Several studies recommend that golfers rotate their lead foot open (towards the target) by roughly 30 degrees. This decreases the stress on the medial (inner) side of the knee, a common area for osteoarthritis. Another adjustment golfers can make in their setup is how close/far they stand from the golf ball during the swing. Standing closer to the ball lowers the peak abduction moment on the lead knee, while standing farther away reduces the peak adduction moment. Depending on which area of your knee is in pain or has experienced previous injury, you may want to implement these adjustments to your setup. If you are experiencing pain on the inside of your knee, you should stand closer to the ball. Conversely, if your pain is on the outside of your knee, you should stand further away from the ball. Other preventative methods include warm-up stretching and regular exercise to activate and loosen the knee joint and surrounding muscles. If you’d like to learn more about these preventative methods, click here.
Raising the Bar: Analyzing Grip Widths and Bench Press Performance
How much do you bench? With the bench press being one of the most popular and effective ways to build muscular size and strength, this question will be asked in weightlifting circles forever. Whether motivated by gaining otherworldly strength or sculpting a dream physique, a large bench press is coveted by gym goers around the world.
The bench press is an upper body weight training exercise where an individual lies on a flat bench with their feet on the floor while repeatedly lowering and raising a loaded bar. The bench press is often broken down into two phases: the eccentric phase (lowering bar to touch chest) and concentric phase (pressing the bar off the chest). When building a strong bench press, nothing is more important than a weightlifter’s technique when performing the movement.
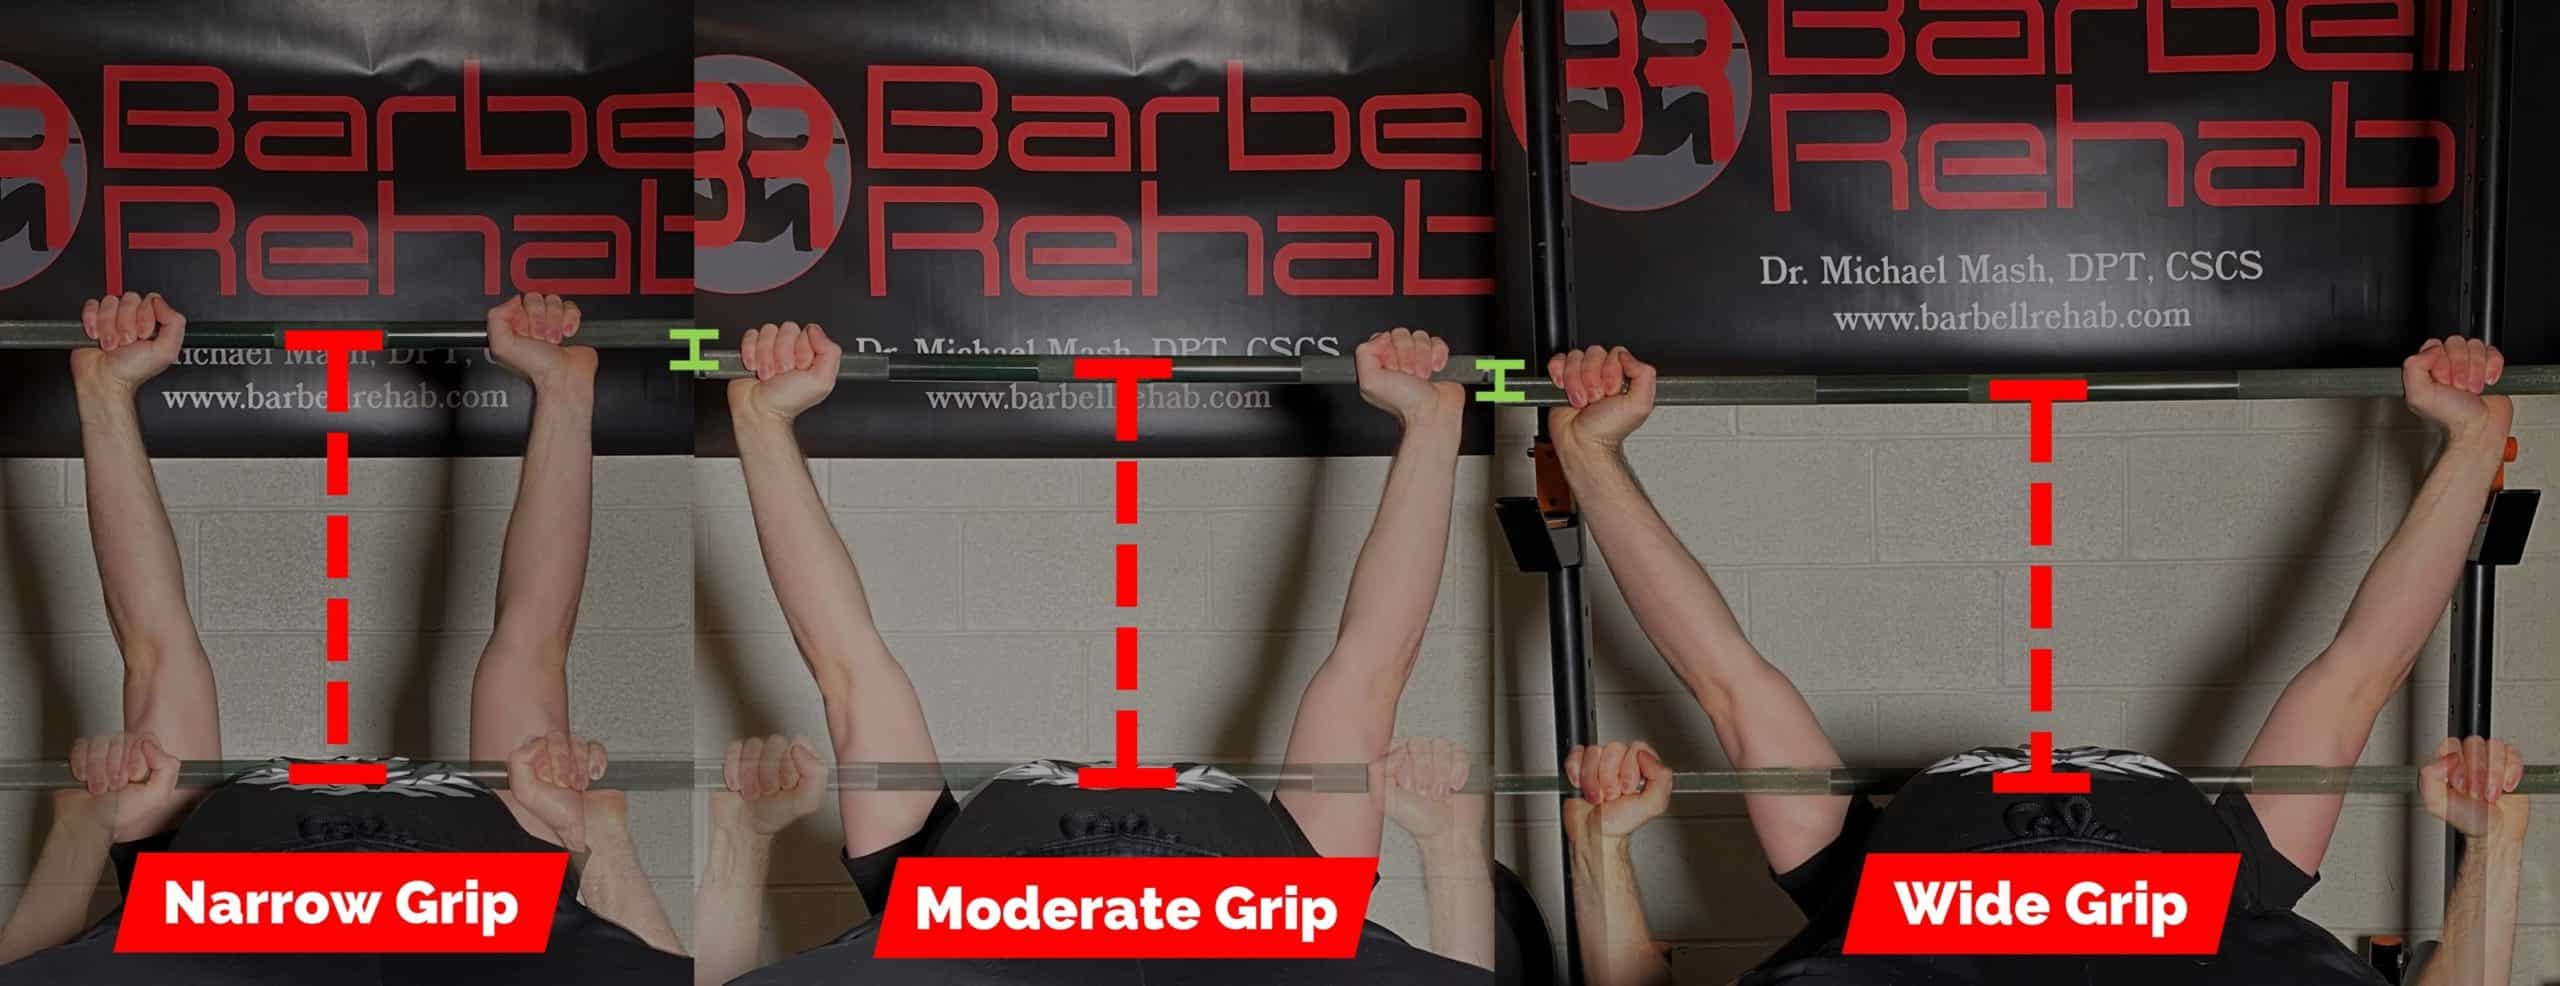
While sounding like a relatively simple exercise, the intricacies of the bench press form largely surround where a lifter grips the loaded bar. The width of an individual’s hands on the bar during a bench press, commonly called grip width, plays an important role in muscular activation and force exertion during the lift. Grip widths are often measured with respect to shoulder width, or bi-acromial distance, in three different grip lengths: wide (around 1.7 times shoulder width), medium (1.4 times shoulder width), and narrow (shoulder width).

The bench press activates three primary muscles: the pectoralis major, anterior deltoids, and the triceps brachii. Muscles in the body have directional fibers that sustain loads most effectively when moving along the direction of their fibers.
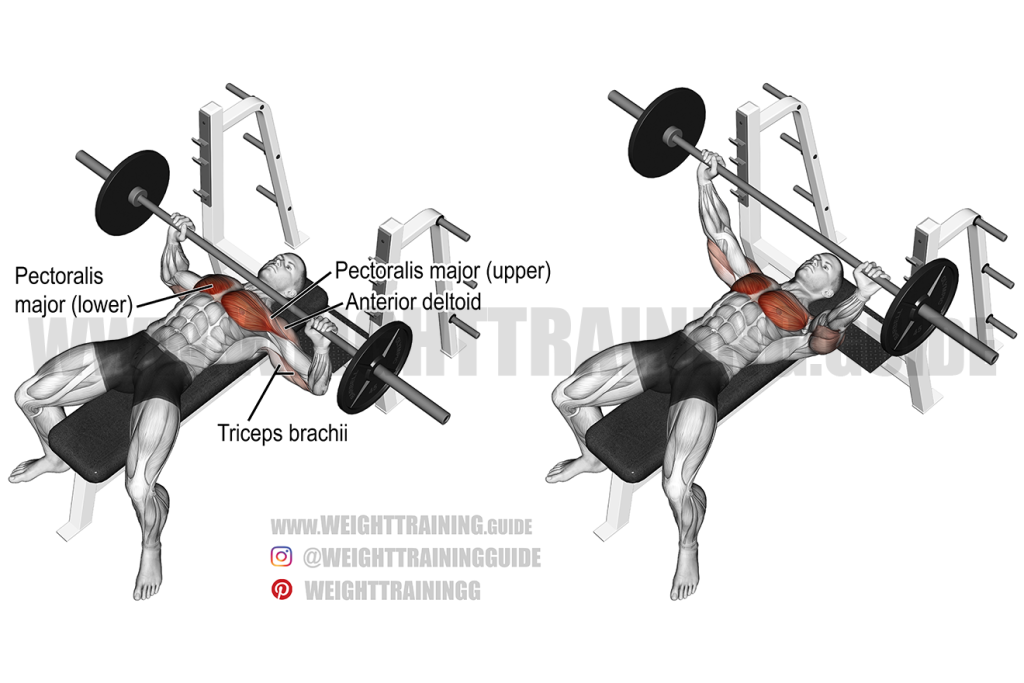
With different grip widths, weightlifters naturally have different levels of shoulder abduction, shoulder rotation away from the centerline of the body, and elbow positioning during the exercise. Grip width impacts muscle activation because different levels of shoulder abduction and elbow positioning align better with the directional fibers of the primary muscles in the bench press. For example, a study explained that grip widths wider than 1.5 times shoulder width resulted in shoulder abduction greater than 45°. When this angle increases the anterior deltoid becomes more involved in the bench press. The largest muscle activated in the bench press is the pectoralis major. The grip width variation that activates the pectoralis major most effectively exerts the most force. The pectoralis major is activated most with the medium and wide grip widths.
In addition to varying levels of muscle activation, different grip widths also play a key role in an individual’s ability to exert force. Most failed bench press repetitions occur at the bottom of the bench press, in a region called the “sticking position”. In the sticking position, the primary muscles activated in the bench press are put in a poor position to exert the forces required to move the loaded bar. A biomechanical study explains that the medium and wide grip widths place the shoulder in more advantageous positions in the sticking position to move greater loads when compared to the narrow grip widths.
However, one study found that grip widths larger than 1.5 times shoulder width leaves the shoulders in a more vulnerable position for injury. Therefore, the safest and most optimal bench press grip width is a medium grip, around 1.4 times shoulder width, to maximize muscle activation, force exertion, and reduce risks of shoulder injuries.
To learn more about the biomechanics of the bench press check out these papers by Calatayud and Tillar.
Bend it like Beckham?: Genu Varum (Bow Leg) in Soccer Players

Soccer, or football for those outside of the United States of America, is the most popular sport in the world, and its popularity is only rising. In the United States, although soccer is not the most popular sport, it is growing rapidly. Part of the reason behind this growth, around 20% American parents think soccer to be a safer sport for their children to play compared to American football. However, soccer players still suffer injuries.
Continue reading “Bend it like Beckham?: Genu Varum (Bow Leg) in Soccer Players”Avoiding Cat-astrophe: How do Cats Land their Crazy Jumps?


Cats always land on their feet, or so the saying goes. Every cat owner has witnessed their feline make death defying jumps and walk away like it’s no big deal. 90% of cats can actually survive falling off of a high rise building. But how do they do it? How do cats absorb the impact of their leaps without sustaining injuries?
Continue reading “Avoiding Cat-astrophe: How do Cats Land their Crazy Jumps?”